ICIS Retriever 5.4
From ICISWiki
Contents |
Introduction
The ICIS Retriever is an MS Access application that extracts data primarily from DMS by the specified property (trait), scale and method. But it also retrieves related information from GMS. When you run the Retriever, RTV menus are added in the MS Access main menu.
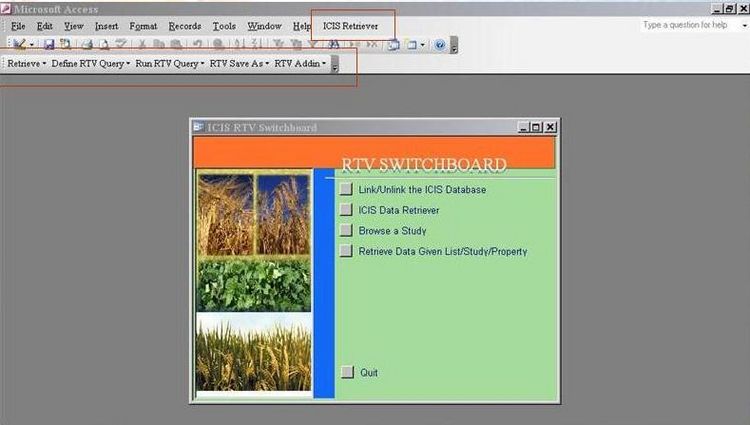
RTV Menu
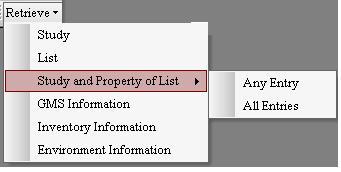
Retrieve
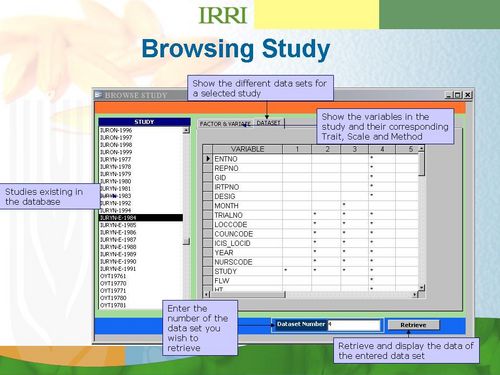
- Study - browses a study and retrieves its dataset
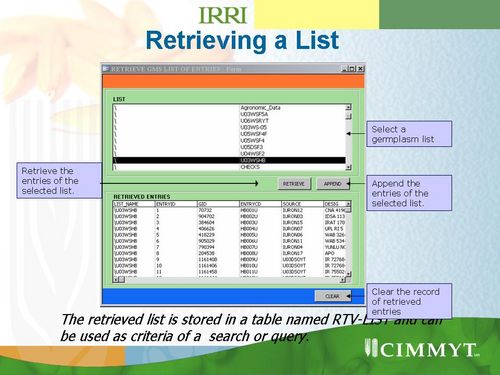
- List - Retrieves a SetGen list into a RTV-LIST table that can be used as criteria for search.
- Study and Property of List
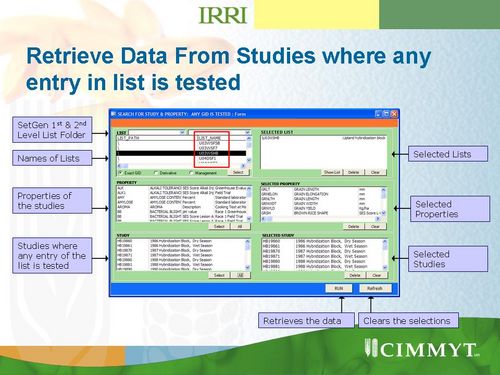
- Any - Retrieves observed or measured data for any entries of SetGen list(s) based on the selected studies and properties
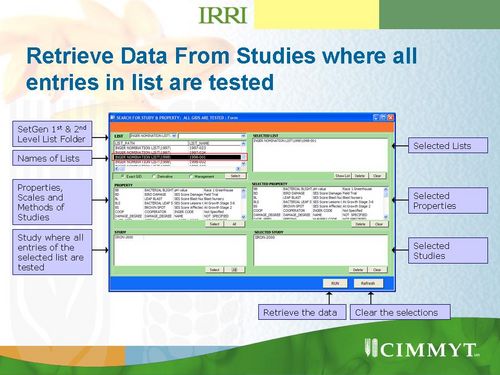
- All - Retrieves observed or measured data from studies where all entries of selected SetGen list(s) are tested
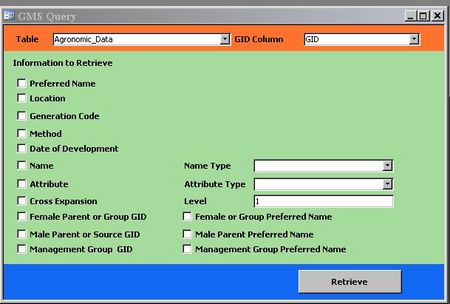
- GMS Information - Gets information from Genealogy Management System for a given query or list
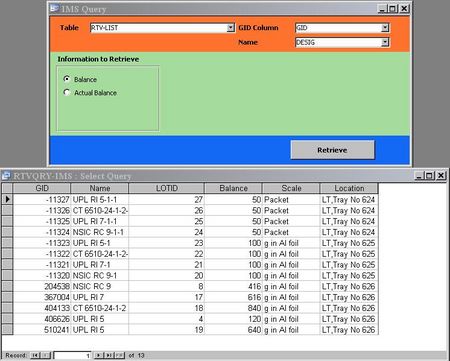
- Inventory Information - Provides the stock balance of the entries in selected query or list
- Environment Information - Provides information about the specified location in a query based on the set environmental variable
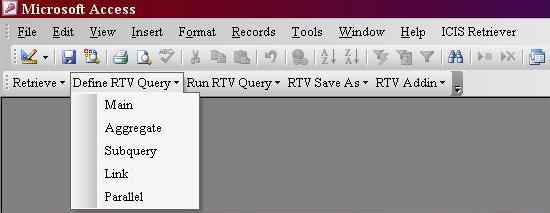
Define RTV Query
- Main - equivalent to clicking the MAIN QUERY button in the ICIS Data Retriever form. [[1]]
- Aggregate - equivalent to clicking the AGGREGATE button in the ICIS Data Retriever form.[[2]]
- Subquery - equivalent to clicking the SUB QUERY button in the ICIS Data Retriever form. [[3]]
- Link - equivalent to clicking the LINK button in the ICIS Data Retriever form. [[4]]
- Parallel - equivalent to clicking the PARALLEL button in the ICIS Data Retriever form. [5]
Run RTV Query
- Main
- Aggregate
- Subquery
- Link
- Parallel
RTV Save As
- IRRISTAT Excel
RTV Addin
Switchboard
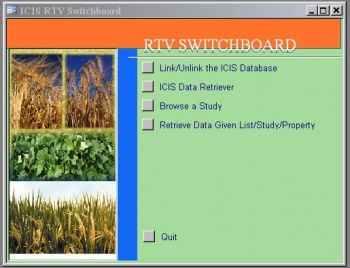
The Switchboard form is the default form shown when ICIS Retriever is run. This is a customizable form where commands can be added aside from the default ones as shown below.
The default Swtichboard form of the ICIS Retriever
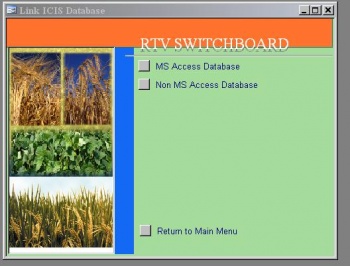
Before any queries can be done, the ICIS databases should be linked to the Retriever. This is done automatically for MS Access databases using the information stored in the ICIS.INI. However, there is still a tool that will allow you to link/unlink the ICIS Databases. To do that, just click the Link/Unlink ICIS Database button in the Switchboard. Two options are provided just as shown in the figure.
The Switchboard menu items for linking ICIS databases
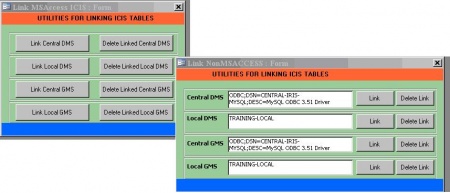
User can click any of the options depending on the ICIS databases they want to access. If the ICIS Databases are MS Access, the form that will be displayed is similar to the figure below. When one of the link buttons is clicked, a dialog box will appear where the folder and the database to be linked can be entered or selected. A different form is used for linking Non-MS Access databases. The full connection path to the database including the ODBC driver, user name and password should be entered as illustrated below.
Link MS Access database form
Queries/Searches
The other command in the Switchboard is to open the ICIS Data Retriever.
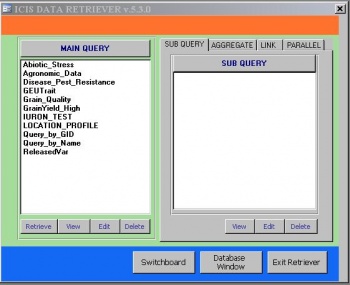
The Data Retriever form allows user to define searches on the DMS which is done through the MAIN QUERY button. Three other kinds of queries can be done on the result of the MAIN QUERY, which are sub query, aggregate query and link query.
Main Query
The Main Query retrieves data from the DMS database based on the property, scale and method provided by the user. It creates a table of columns corresponding to the variable names given by the user to each property. . Defined queries are shown in the list under the Main Query button. To run a defined query, click the Retrieve button. View button displays the resulted table. Edit button allows user to modify the defined query while Delete button will delete the definition of the query and all related queries with it.
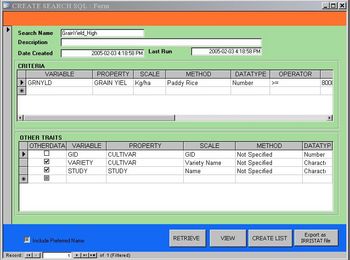
To create a new main query, click the “Main Query” button on the Data Retriver and a screen similar to figure shown below.
The Main Query retriever accepts two sets of properties. The first set contains the properties to be used as criteria to the query while the second set includes the other properties of interest to the user in relation to the criteria. For the criteria part, the user has to provide the property, scale, method, operator, data type and a restricting value. A variable name for the property should also be provided which will be the column name in the resulted table. For the other properties of interest, the user has to specify similar information as the criteria trait except the operator and the restricting value.
The Main query form
The Retriever runs the query and creates a table named after its specified name by clicking the RETRIEVE button.
Parts of the Main Query form
- Search Name - a meaningful name of the query. The name can be any alpha-numeric charaters with no blank and special characters in between.
- Description - a useful description of the query
- Date Created - the date the query is created which is automatically filled up
- VARIABLE column - any variable name with no space in between. If the variable name is used in any study in the database, the system will automatically fill up the Property, Scale and Method based on the associated information of the existing name.
- PROPERTY column - property or trait of the variable
- SCALE column - measurement unit of the variable
- METHOD column - the procedure on how the variable is measured or derived
- DATA TYPE - the type of data of the variable which is either number or character
- OPERATOR - if the data type is Number, it can be any of this: =, >, <, >=, <=, LIST. If the data type is Character, it can be either LIKE or LIST
- VALUE - the restricting value or a table name that contains list of values if the operator is LIST. The table name can be created by double clicking on the entered table name
Sub Query
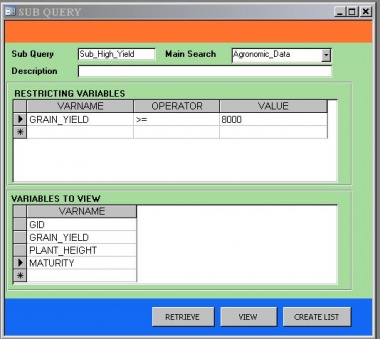
The sub query creates a subset of the main query based on a criteria specified by the user. The retriever for the sub query is similar to the screen below and it is activated by clicking the SUB QUERY button under the SUB QUERY tab.
The sub query form
The main query name is specified beside the Main Search text box. Then the name of the sub query is entered beside it. In the CRITERIA section, the user will select variables from the main query table, their corresponding operators and the restricting values. In the TRAITS TO VIEW section, the user will list the variables to be viewed. The query is built by clicking the RETRIEVE button.
Parts of the Sub Query
- Sub Query Name - a meaningful name of the sub query which can consist alpha-numeric characters with no blank and special character in between
- Main Search - the main query where you intend to subset
- RESTRICTING VARIABLES
- VARNAME - a variable of the main query which is the basis of the subsetting
- OPERATOR - the operator to restrict the result. If the variable contains numeric data, it can be either of =, >, <, >=, <=, <>. If it contains character data, the LIKE operator can be used. IS operator can be used for either number or character data
Aggregate Query
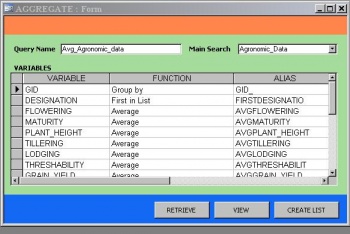
Averages, minimum values, maximum values and other aggregate group values can be computed in the Retriever using the AGGREGATE query retriever. This retriever is enabled by clicking the “AGGREGATE” button in the AGGREGATE tab and a screen similar to Fig. 10.5.4 will be shown. The aggregate values are computed from a main query and the user has to specify its name in the text box at the topmost of the retriever. A new name for the aggregate query is entered on the lower text box.
In the VARIABLES section, the user specifies the grouping function to apply to the variables of the main query. For variables of numeric type, the Retriever can perform the following grouping functions: sum, count, average, minimum, maximum. For variables, the user can specify the find first and find last function. Variables with GROUP BY option are the basis of the grouping. Users must specify a new variable name for the aggregate value in the ALIAS column.
Fig. 8.4.1 The screen for computing aggregate values
By clicking the RETRIEVE button, the aggregate query is built.
Link Query
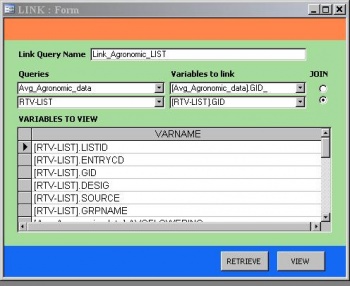
The user can link queries through the LINK query retriever which is activated by hitting the LINK button of the LINK tab. As shown in Fig. 10.5.5, the LINK query asks for the names of the two queries to be linked and the variables where the linking will be constructed. RTV-LIST table, which contains the entries of a retrieved germplasm list can also be linked with a query. In the OTHER VARIABLE section, the user needs to list the variables to view in the link query. By clicking the RETRIEVE button, a query labeled after the link name is created.
Fig 8.5.1 Creating link between queries
Parallel Representation of the Query Results
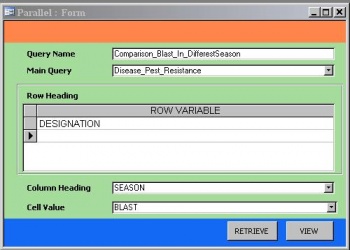
There are situations when data are better viewed in parallel than in serial. The Retriever has a tool for presenting data set in parallel. A data set is in parallel format when the values of one of its variables become the column names. The parallel query has a screen similar to Fig. 8.6.1. It is activated by clicking the PARALLEL button of the main screen. At the topmost part, the user will select a main query to be viewed in parallel. The new name of the parallel query is entered on the lower text box. The Column Heading is the variable whose values will become column names. The Cell Value is the variable whose values will be displayed under the columns created by the parallel variable. The Row Heading is the other variable which will define the rows of the parallel query. The query is built by clicking the RETRIEVE button.
Fig. 8.6.1 Screen for creating a parallel view of a main query
Creating a SetGen list
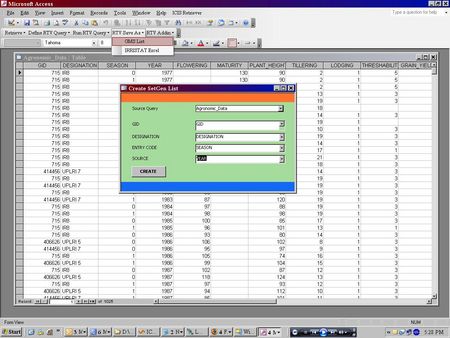
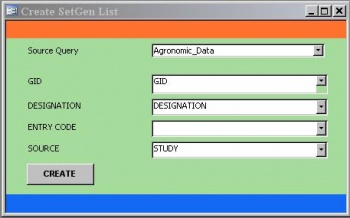
The germplasm entries retrieved from the Main Query, Sub Query, Aggregate Query can be stored as SetGen List by clicking CREATE LIST. Its form is similar to Fig 8.7.1. On the Source Query, specify the queries to store as SetGen list. Then, on the box beside GID, select the columns or variables f the query which corresponds to GID. Similarly, select the columns that correspond to DESIGNATION, ENTRY CODE and SOURCE if there is any. Click CREATE to make the SetGen list.
Fig. 8.7.1 Screen for creating a SetGen list
Customizing the Switchboard form
The Switchboard form is a customizable form, which allows the user to define his own frequently used commands or queries or to open his reports. The menu items in the Switchboard can open a report, run a query or execute a macro or code. The menu and its items are stored in the Switchboard Items table. The user can add or modify a menu entry in this table.
The Switboard Items table consists of the following fields:
| Field | Description |
|---|---|
| Swtichboard ID | level or id of the menu, 1 - first level menu |
| Item Number | the order of the items in the menu; 0 - menu name |
| ItemText | the text or caption that will appear on the screen |
| Command | specifies whether to open a form, a report, or run a macro or code |
| Argument | name of the form or report to open, macro or code to run |
| Options | when the argument is SearchList or SearchStudy form, the macro that corresponds to the choices made on the switchboard menu is run. |
The command field can take the following values
| Command | Description |
|---|---|
| 1 | another switchboard menu |
| 2 | open a form in append mode |
| 3 | open a form in browse mode |
| 4 | open a report |
| 6 | Exit application |
| 7 | Run a Macro |
| 8 | Run a Code in Module |
| 9 | Run a query |
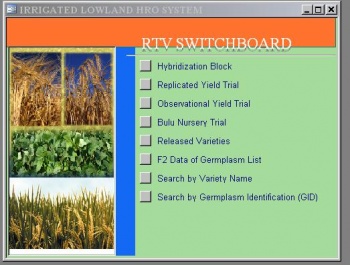
As an example, if the user desires to have a menu that looks like Figure 10.5.8 with some menu items opening another menu and some running macros, the following will be records of the Switchboard Items table.
| SwitchboardID | ItemNumber | ItemText | Command | Argument | Options |
|---|---|---|---|---|---|
| 1 | 0 | IRRIGATED LOWLAND HRO SYSTEM | 0 | Default | Irrigated Lowland HRO System |
| 1 | 1 | Hybridization Block | 1 | 4 | |
| 1 | 2 | Replicated Yield Trial | 1 | 2 | |
| 1 | 3 | Observational Yield Trial | 1 | 6 | |
| 1 | 4 | Bulu Nursery Trial | 1 | 8 | |
| 1 | 5 | Released Varieties | 1 | 5 | |
| 1 | 6 | F2 Data of Germplasm List | 1 | 7 | |
| 1 | 7 | Search by Variety Name | 7 | Query By Name | |
| 1 | 8 | Search by Germplasm Identification (GID) | 7 | Query By GID |
Fig. 8.8.1 A sample menu of the Switchboard form
Clicking the Hybridization Block opens another set menu items in the Switchboard. Some of the menu items of Hybridization Block have the following commands. The Item number 10 returns the Switchboard to its Main Menu.
| SwitchboardID | ItemNumber | ItemText | Command | Argument | Options |
|---|---|---|---|---|---|
| 2 | 0 | RYT Nursery | 0 | ||
| 2 | 1 | Set up RYT Study | 7 | RYT Study | |
| 2 | 2 | Get Entries of RYT List | 7 | Get RYTList | |
| 2 | 3 | Plot Management | 1 | 3 | |
| 2 | 4 | Entry Datasheets | 3 | HRO Nursery | RYT*; |
| 2 | 5 | Entry Data Form | 3 | HRO Nursery Form | RYT;AllTrait |
| 2 | 6 | View Selected Traits | 3 | HRO Nursery Form | RYT;SelectedTrait |
| 2 | 10 | Return to Main Menu | 1 | 1 |
