TDM GMS SEARCH 5.5
From ICISWiki
Back to Technical Documentation Main Window
Summary of New Features
GUI Makeover
A major change in the User Interface is done to have a more organized layout.
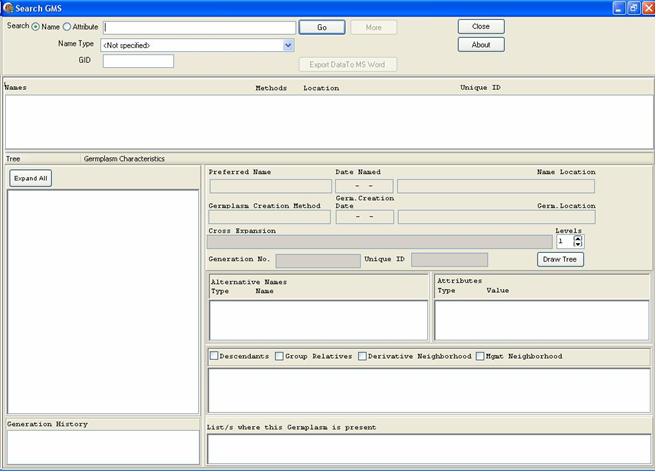
Previous Implementation :
New Implementation :
- The Tree window now includes the Draw Tree button. Notice that the tree has a descriptive information on its tab(Ancestor Tree). This window shall include the Descendant Tree in the future.
- Some germplasm information are separated by tabs.
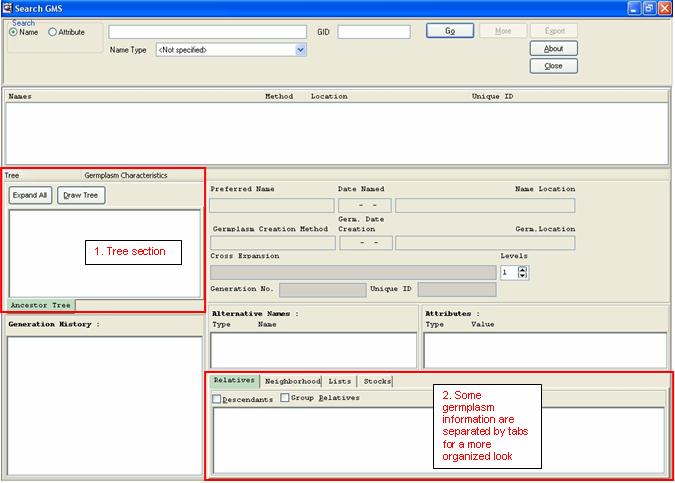
Notice that the selected tab is highlighted with a green color.
Derivative Neighborhood now displays the level
The previous implementation of the Derivative Neighborhood displays the GIDs and Preferred Names in a pop-up window.
Previous Implementation :

The new implementation improves this approach by displaying the information on a separate tab in the GMS Search window. Notice that the level of the derivative neighbor is displayed.
New Implementation :

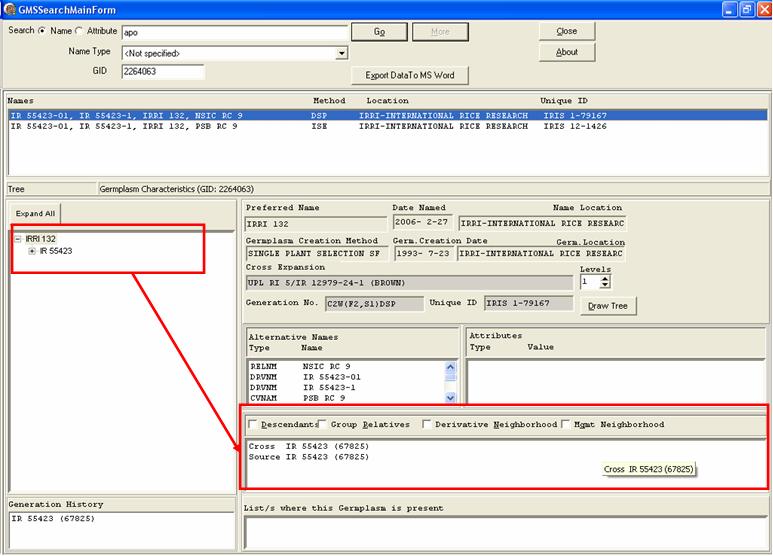
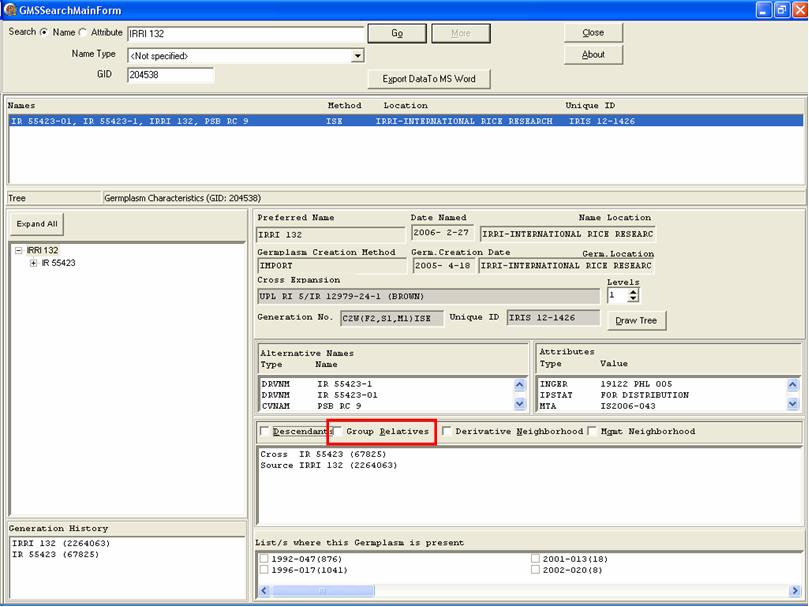
Relatives window now displays GID of relatives
The previous implementation of Group Relatives displays the Preferred Names of the germplasm belonging to the group in a listbox in the GMS Search window.
Previous Implementation:
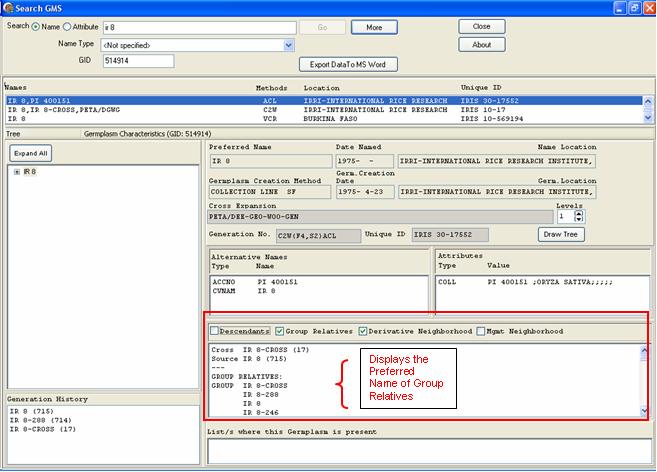
The new implementation enhances this layout by displaying the information on a separate tab within the GMS Search window.
Notice that the GIDs of the group relatives are displayed in parentheses.

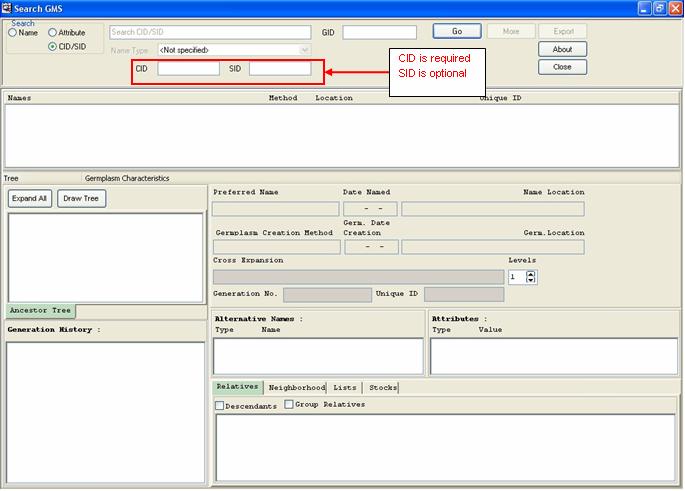
Search by CID/SID
This search function is created specifically for the CIMMYT Wheat database, as reference to their old system's data handling. GMS Search checks the database for the occurence of the CID and SID fields in the Germplasm table.
If these fields does not exist, then the option to Search by CID/SID is disabled.

When CID and SID are present in the Germplasm table, a search by CID/SID option is displayed at the upper left hand corner of the GMS Search window.

The CID field is required for this search, while the SID is optional.
When SID is specified, GMS Search displays the record for that specific CID-SID combination.
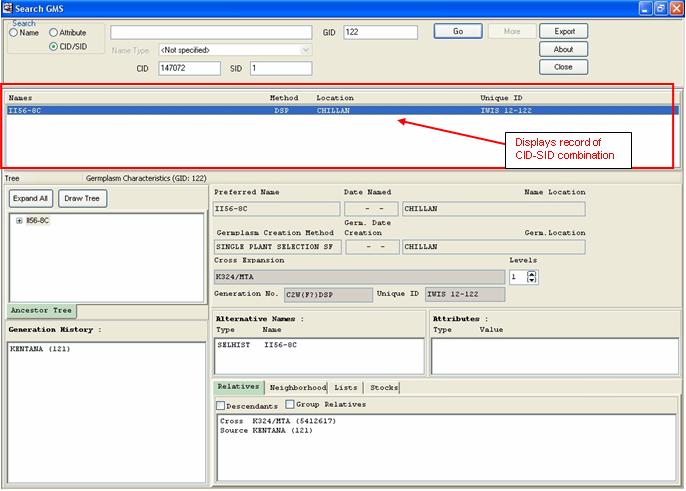
When SID is blank, GMS Search displays all records for the given CID.

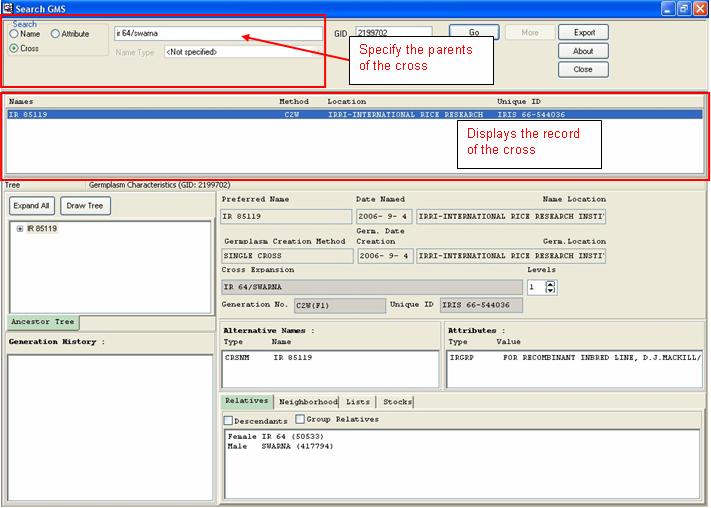
Searching crosses by specifying the cross parents
A heavily used function in Browse, this feature is added in GMS Search. (Note : under development)
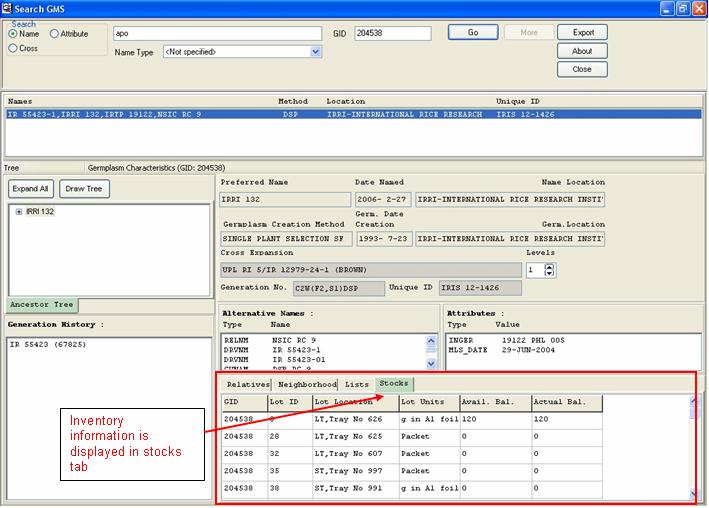
Inventory Information in Stocks Tab
Inventory data is now shown.
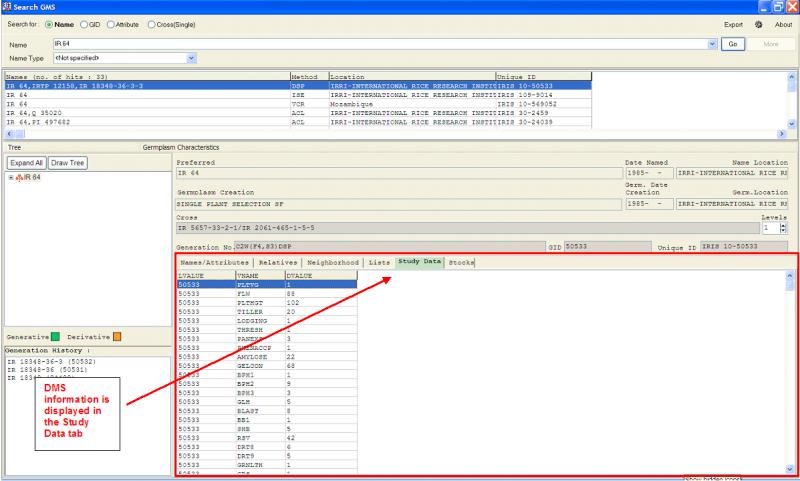
Displaying DMS iInformation
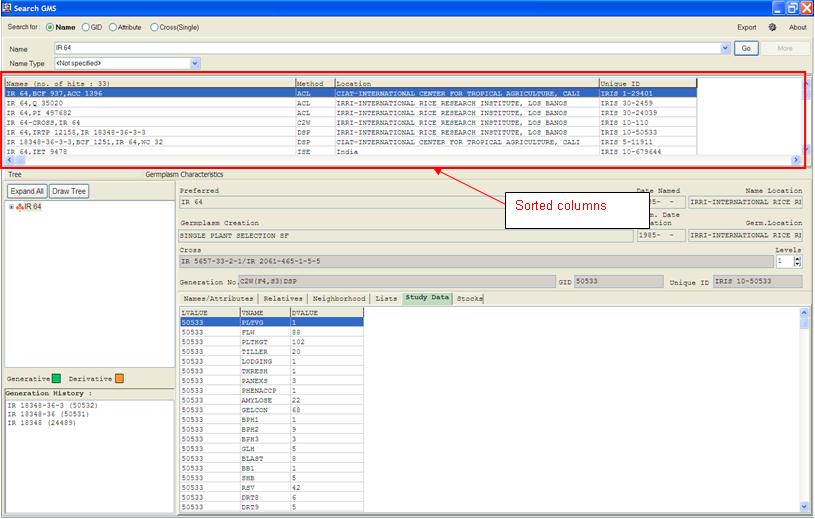
Relevant information in a study is now displayed in a separate tab.
To view this information, set the sql statement in the StudySQL key of the in the [GMSSRCH] section of the INI file
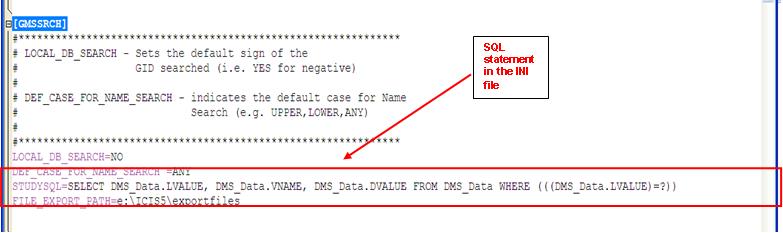
Whe searching for a germplasm, DMS information is shown on the Study Data tab
Sorting of Columns in Search Result
GMS search is now capable of sorting records in the search result window (which resulted in replacing the old component and used another component to hold the name search items).
Initially the search result window has unsorted columns.
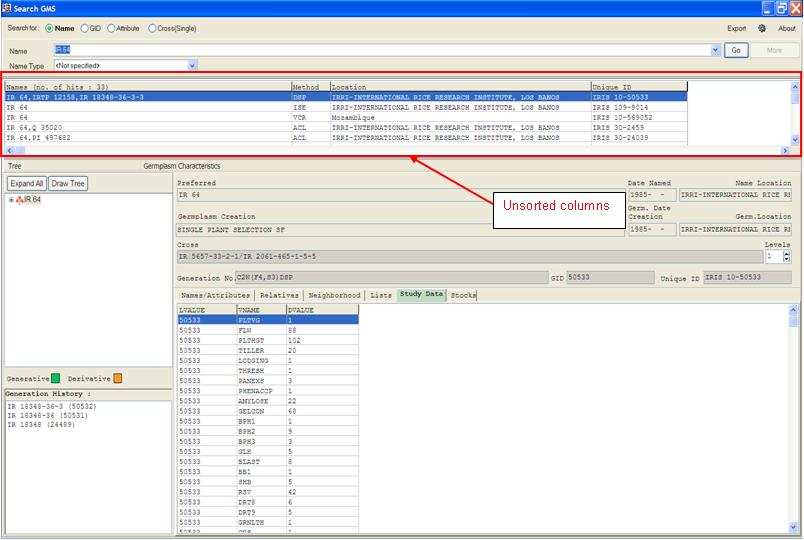
To sort rows in this window, just click on the column header of your choice.
Icons to Differentiate Breeding Methods
To differentiate breeding methods, icons were added.
- an orange tree represents a derivative descendant tree
- a green tree represents a generative descendant tree
- an orange cross symbol represents a descendant with method = derivative
- an orange male gender symbol represents a male parent with method = derivative
- an orange female gender symbol represents a female parent with method = derivative
- a green cross symbol represents a descendant with method = generative
- a green male gender symbol represents a male parent with method = generative
- a green female gender symbol represents a female parent with method = generative
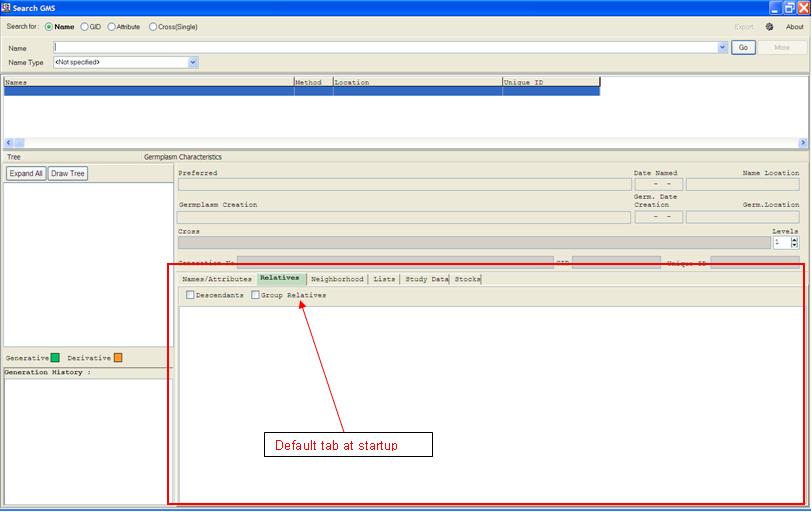
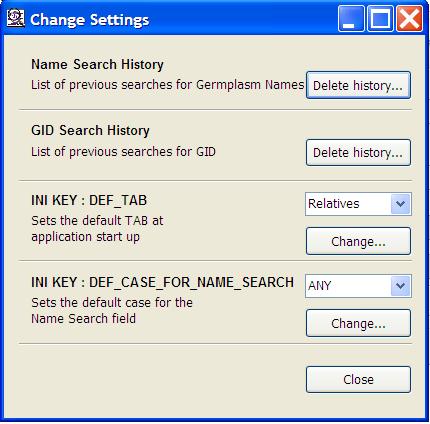
Setting of Default Tab
The INI key DEF_TAB in GMSSRCH section sets the active tabpage at startup.

Setting of Default Character Case of searched names
To standardize the letter case while searching, a new INI key is added in the GMSSRCH section of the INI file.
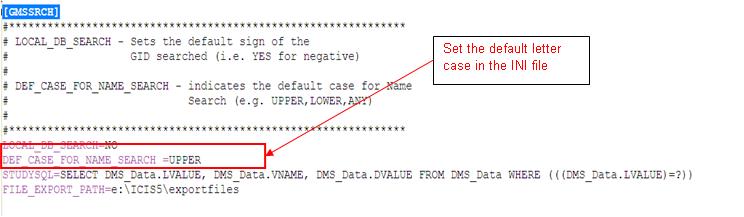
For example, setting DEF_CASE_FOR_NAME_SEARCH = UPPER defaults the name search field to UPPERCASE.

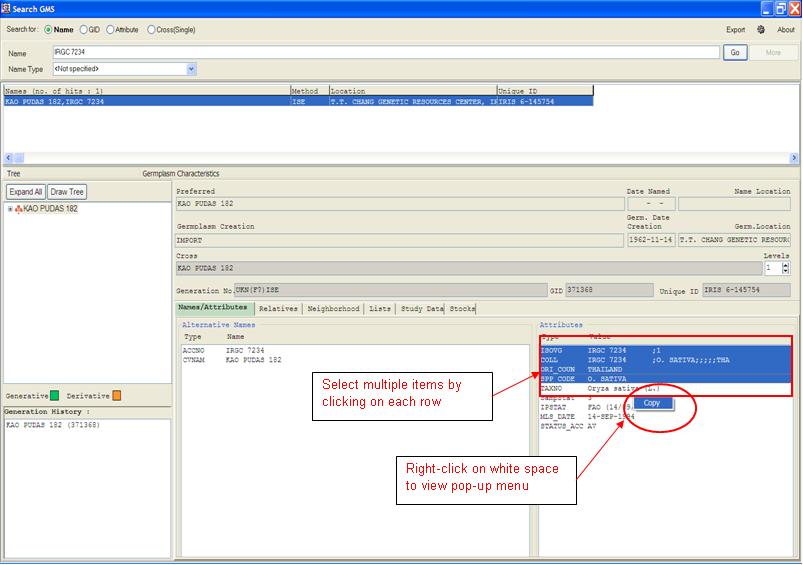
Multiple Select and Copy of items in the Tabpages
One of the nicest features of GMS Search is the ability to copy multiple items to the clipboard and pasting these items in any editor, like the Notepad or Microsoft Word.<br
To copy multiple items in the tab, just click on the row of each item, then right click on the white space then select Copy on the pop-up menu.
Open an editor, for example, Notepad, then right-click on the white space and select Paste on the pop-up menu.<br.
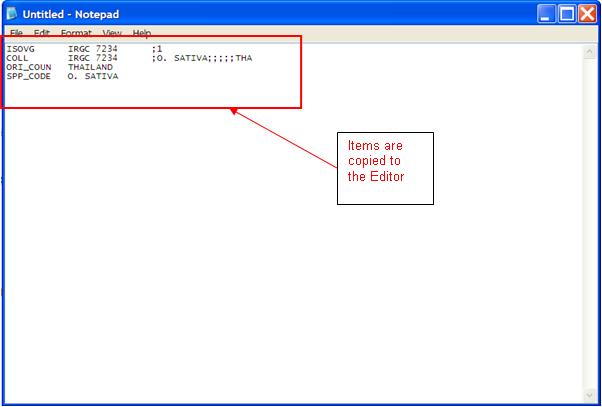
The items are copied to the editor.
Setting of auto-completion of Recently Typed-in Text For Editboxes
Autocompletion is a feature of GMS Search that pops-up a window, listing possible completions for searched names that the user has previously typed.

History of Searched GIDs
automatic GID completion is another feature of GMS Search which displays possible searched GIDs in a dropdown window.

Configuration Settings
GMS Search settings can be changed through the configuration settings window.
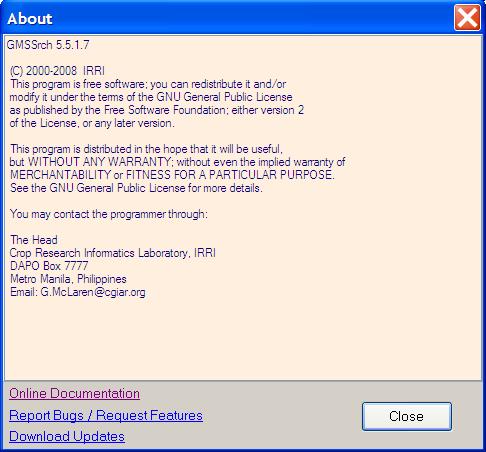
Important Links included in About Form
THE GMS SEARCH APPLICATION
Introduction
The GMS SEARCH application is a tool for finding germplasm in the GMS, and displaying its corresponding information and/or any relevant information attached to it.
Starting GMS Search
Start GMS Search by selecting GMSSRCH from the ICIS Launcher.
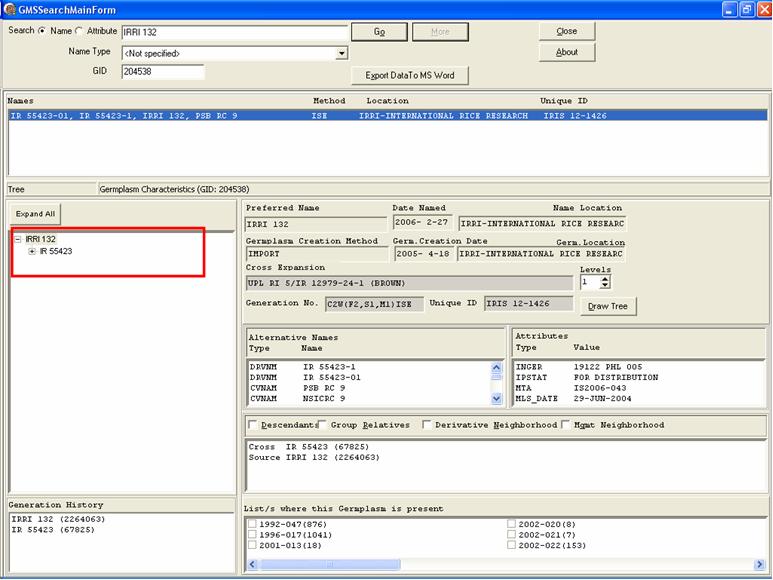
Main Screen
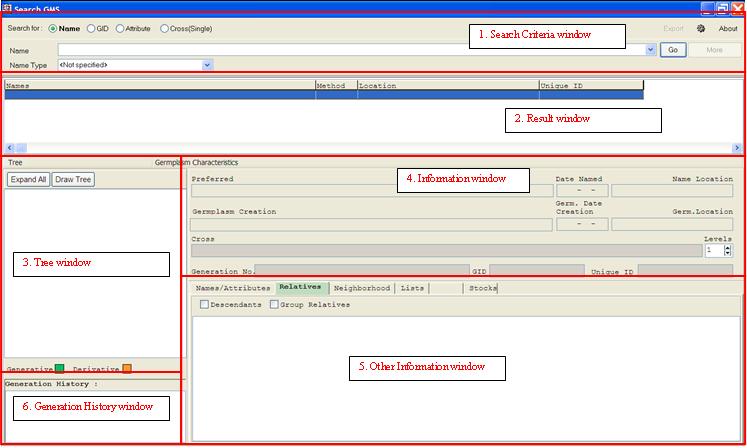
The Main Screen is basically a form which allows users to enter a search condition and results are displayed on the form.
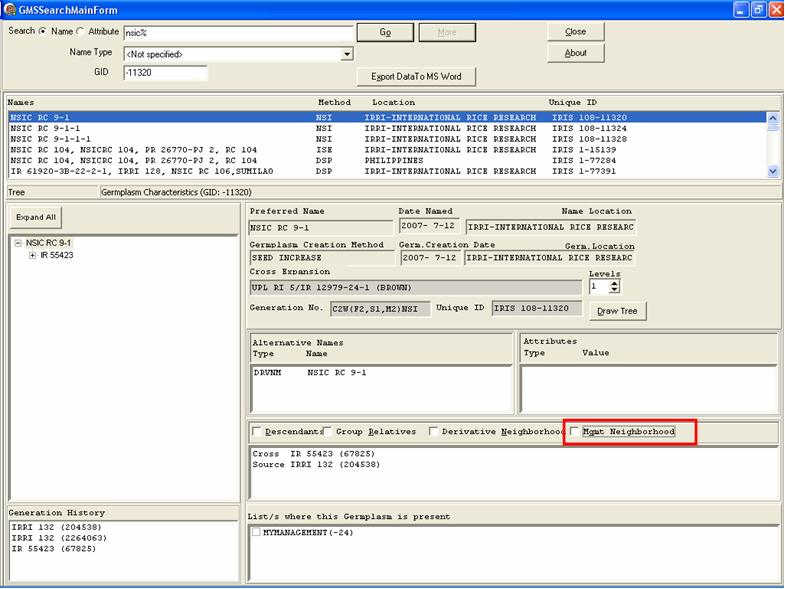
The Main Screen is divided into nine parts:
- The first part is the Search Criteria window where the user is given an option to either search by Name, Attribute or GID. A facility to Export Data to MS Word is also found in this window. Take note that the search type is defaulted to Name.
- The second part is the Result window where the system displays the Name, Method, Location, and Unique ID of the records that matches the search condition.
- The third part is the Tree window, located on the middle-left part of the form, which displays the lineage of the selected record from the Result window.
- The fourth part is the Information window, located at the middle-right part of the form, which displays the Preferred Name, Date[when the germplasm is] Named, Name Location[where the germplasm is named], Germplasm Creation Method, Germpl. Creation Date, Germ. Location[where the germplasm is located when named] , Cross Expansion, Generation No.[the germplasm level on the hierarchy] and Unique ID [a combination of the CROP, USERID and local GID assigned to the germplasm] of the selected record from the Tree window.
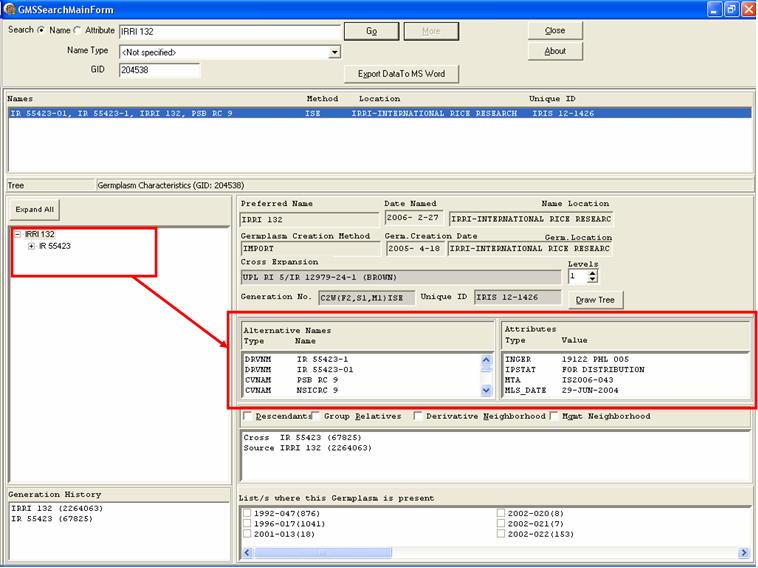
- The fifth part is the Alternative Names window, located just below the Information window, which displays other names or substitute names associated (Type and Name) to the selected record from the Tree window.
- The sixth part is the Attributes window, sitting next to the Alternative Names window and below the Information window, displays the characteristics or traits (Type, Value) of the selected record from the Tree window.
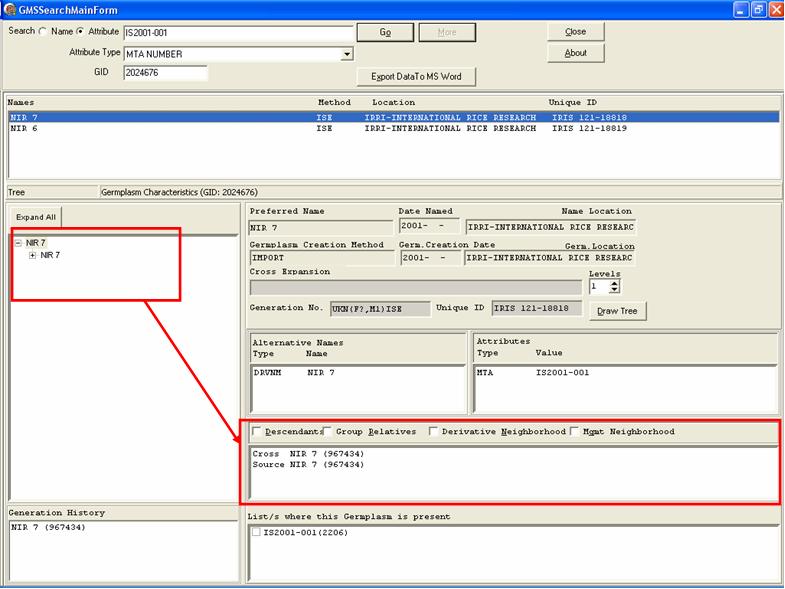
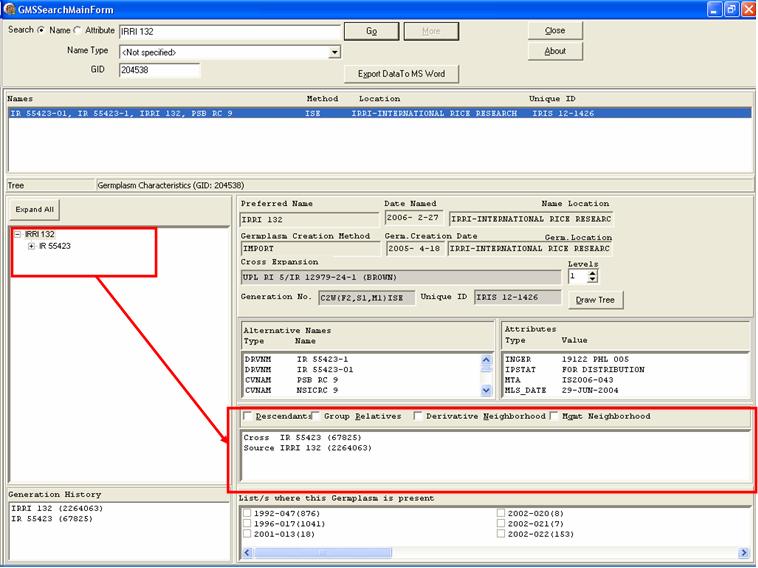
- The seventh part is the Relatives window, located below the Alternative Names and Attributes windows, which displays the family of the selected record from the Tree window : the parents(for generative method) or group source(for derivative method), Descendants, Group Relatives, Derivative Neighborhood and Management Neighborhood.
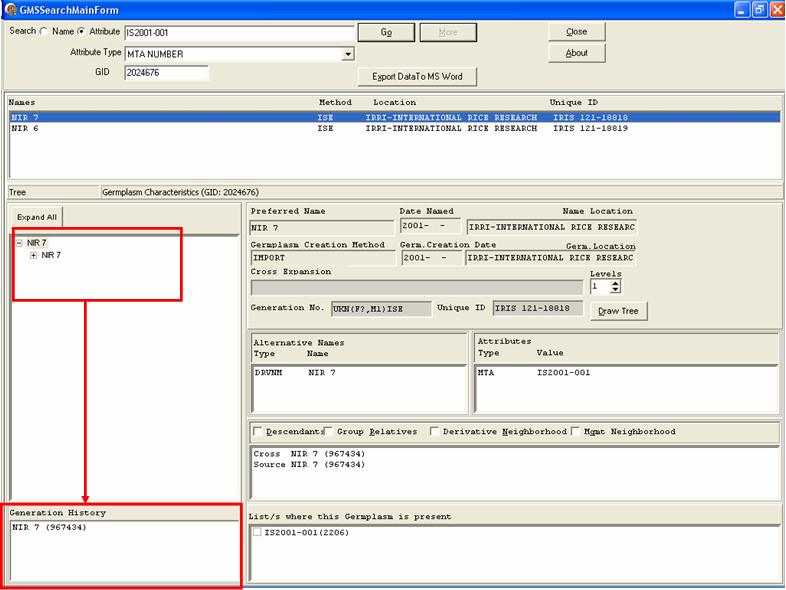
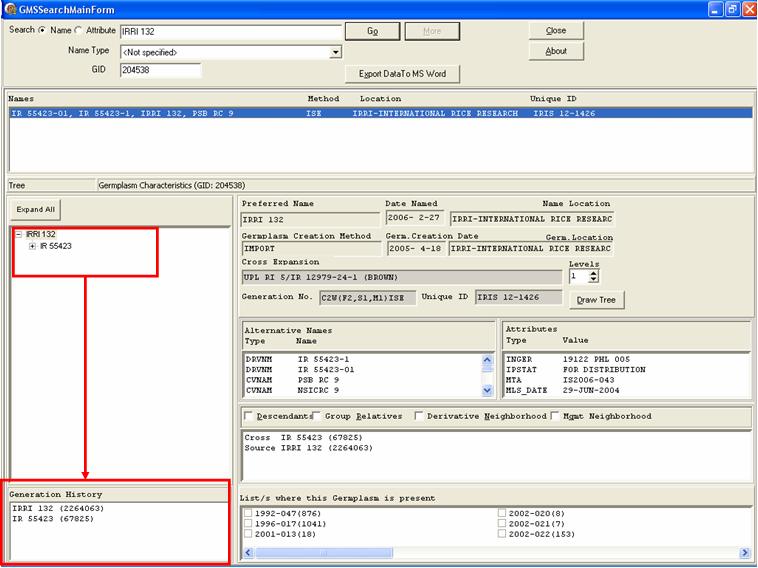
- The eighth part is the Generation History window, located at the bottom-left part of the form, displays the origins of the selected record from the Tree window.
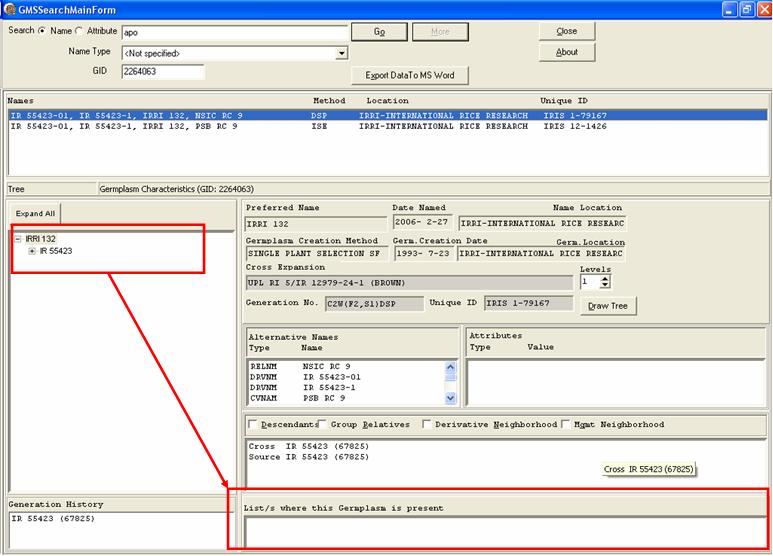
- The ninth part is the Lists window, located on the bottom-right of the form, displays the lists where the record selected from the Tree window is present.
Searching by Name
To search a germplasm record by name, click on the Name radiobutton, then type the search string on the blank window next to the Attribute radiobutton.
A search string may contain wildcard characters ‘_’ and ‘%’. Use the underscore character, ‘_’, to represent any single character at a specific position in the name. Use the percent sign, ‘%’, to represent any string starting where the ‘%’ is located. For example, ‘IR 43%’ performs a search on all germplasm whose names start with ‘IR 43’, including ‘IR 43.’
The following are basic rules when using wildcard characters:
- The ‘_’ can appear in any specified position of a search string: at the beginning (i.e., ‘_R 43’, at the end (i.e., ‘IR 4_’), or anywhere between the start and end positions (i.e., ‘IR _3’).
- A search string can contain more than one ‘_’, or can be used together with ‘%’. The following are valid search strings: ‘IR 15__5’, ‘IR 1_6_1’, ‘IR __’, ‘IR 4861_-%’.
- The ‘%’ should only be placed at the end of a search string. Placing the ‘%’ at the beginning or in the middle of a search string results in an indefinite name search. The application will have to be terminated abnormally.
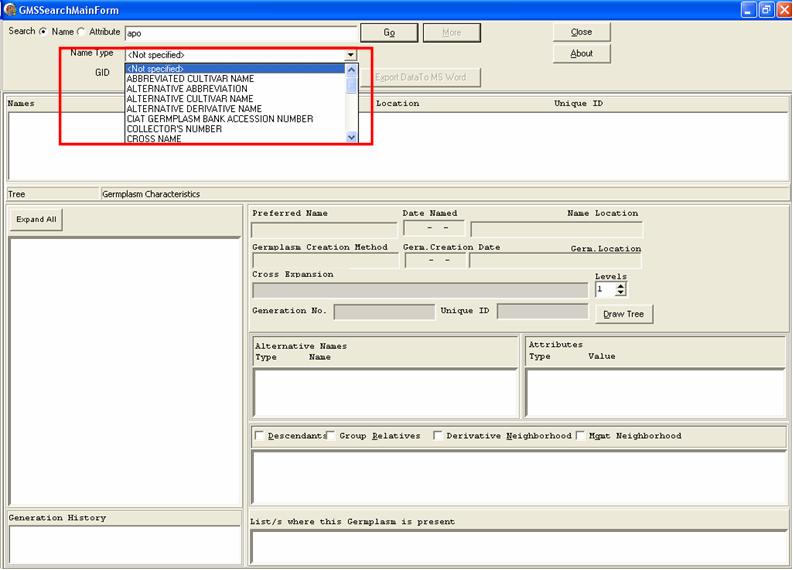
Helpful Tip : typing the Name Type scrolls down and points to the record on the pulldown window.
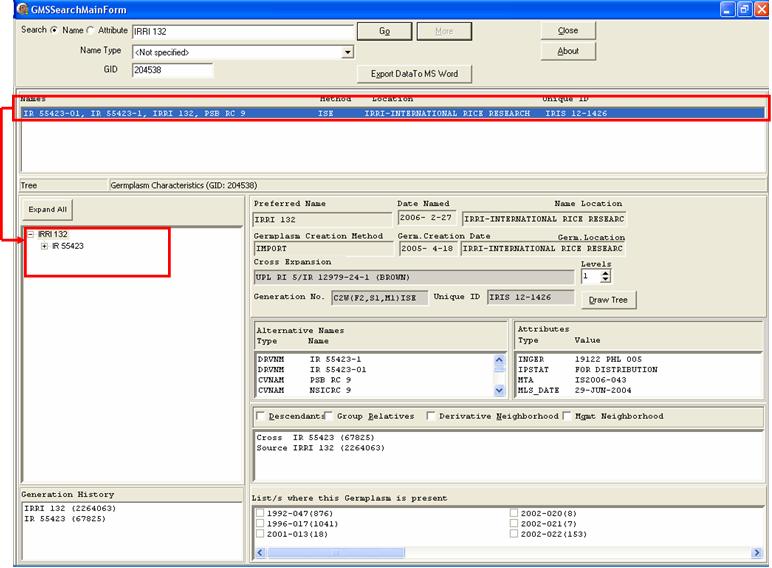
Then Click on the Go button to begin searching. The system looks for name matches to the search string exactly as it is typed, allowing for wild characters, and after the name standardizations have been applied to the string.
The system displays all records that meet the search criteria. Notice that the first record on the Result window is selected and displays its hierarchy on the Tree window.
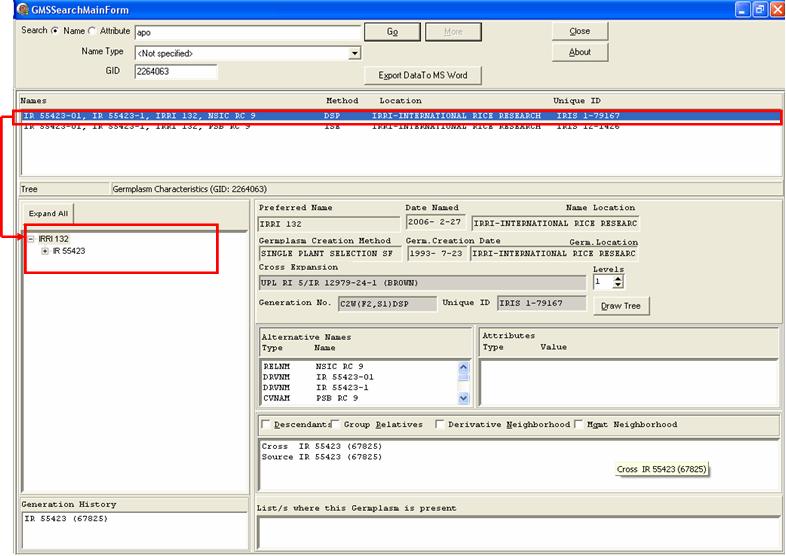
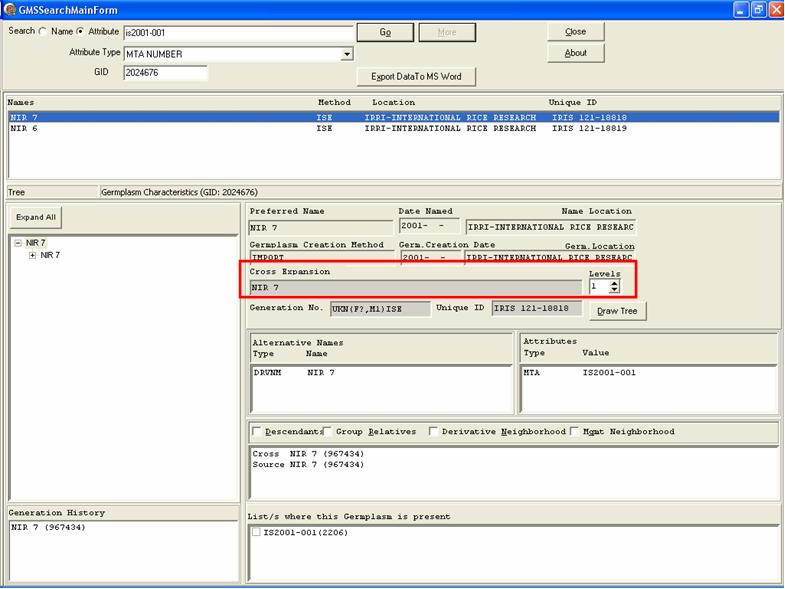
The first node on the Tree window is selected and its information is displayed on the Information window.

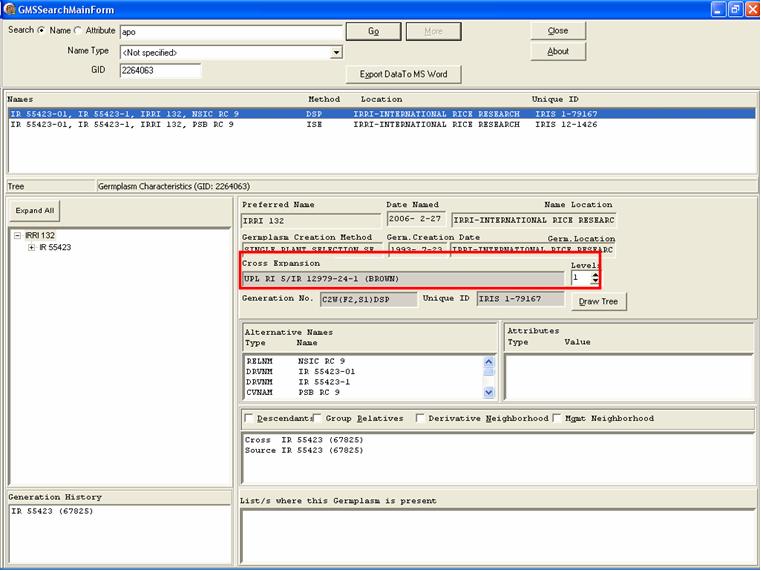
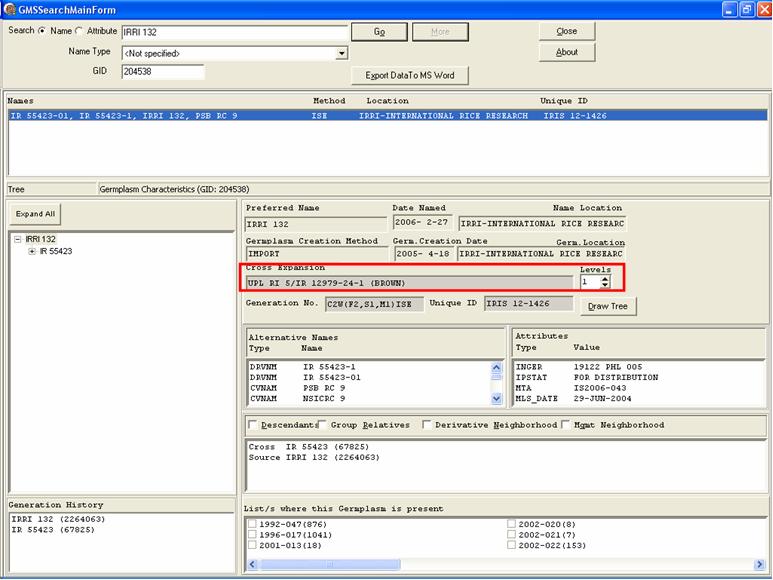
Beside the Cross Expansion is the no. of levels displayed in a spin window. To view a cross expansion at a different level, change the levels counter to the desired value. The cross expansion is displayed up to the no. of levels specified, or the highest no. of levels possible, whichever is lower. On the event that a negative no. is specified, the system shows the preferred name of the selected GID node from the Tree window.
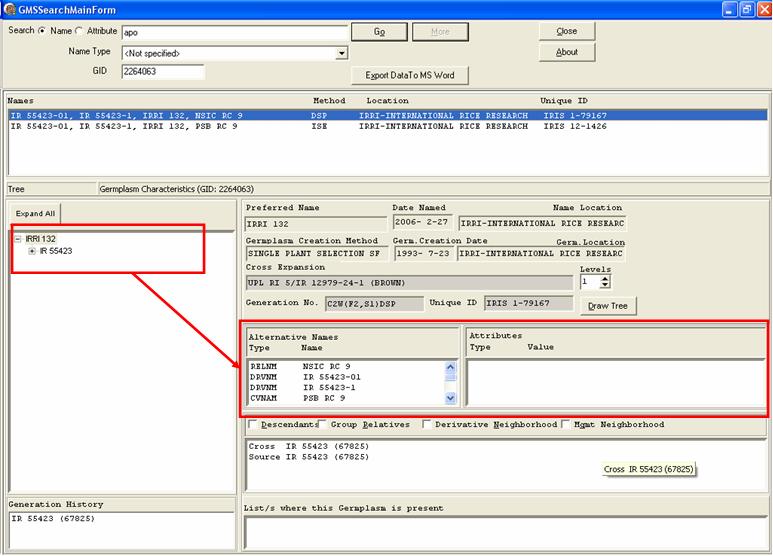
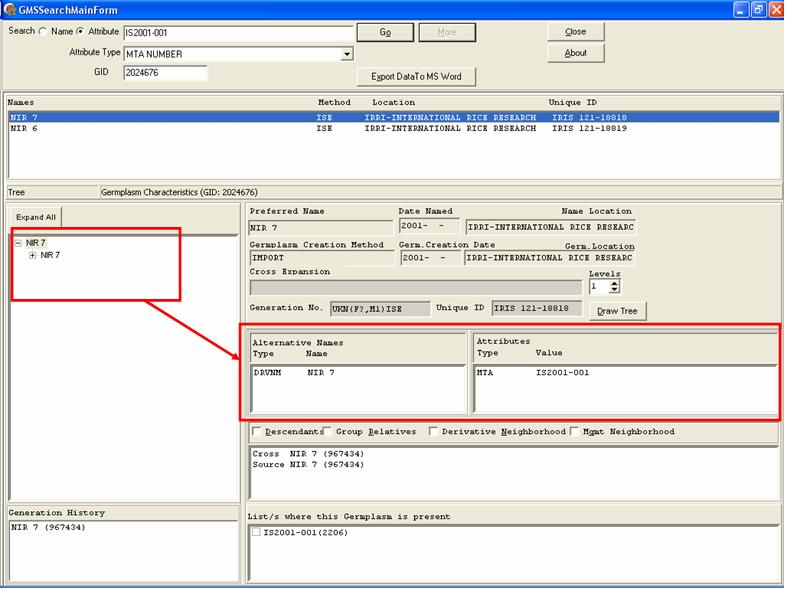
The Alternative Names and Attributes windows displays other names or substitute names, and characteristics or traits, respectively, of the selected node from the Tree window.
The Relatives window displays the relatives of the selected node from the Tree window as well.
The Generation History window displays the origins of the selected node from the Tree window.

The List window displays the lists where the selected node from the Tree window is present.
Searching by Attribute
To search a germplasm record by attribute, click on the Attribute radiobutton, then type the search string on the blank window next to it.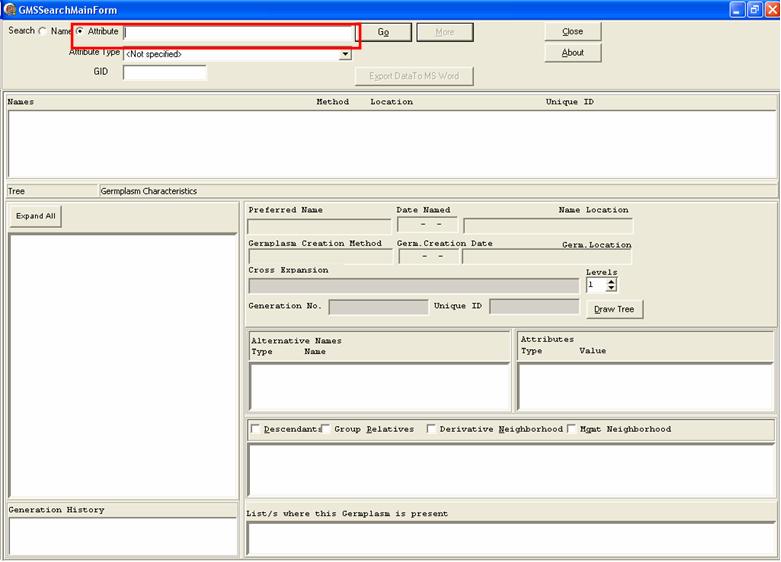
The category of the Attribute is identified by selecting an item from the Attribute Type pulldown window.Otherwise, leave this blank to retrieve all records regardless of the attribute type.

Helpful Tip : typing the Attribute Type scrolls down and points to the record on the pulldown window.
Then Click on the Go button to begin searching.The system displays all records that meet the search criteria. Notice that the first record on the Result window is selected and displays its hierarchy on the Tree window.

The first node on the Tree window is selected and its information is displayed on the Information window.
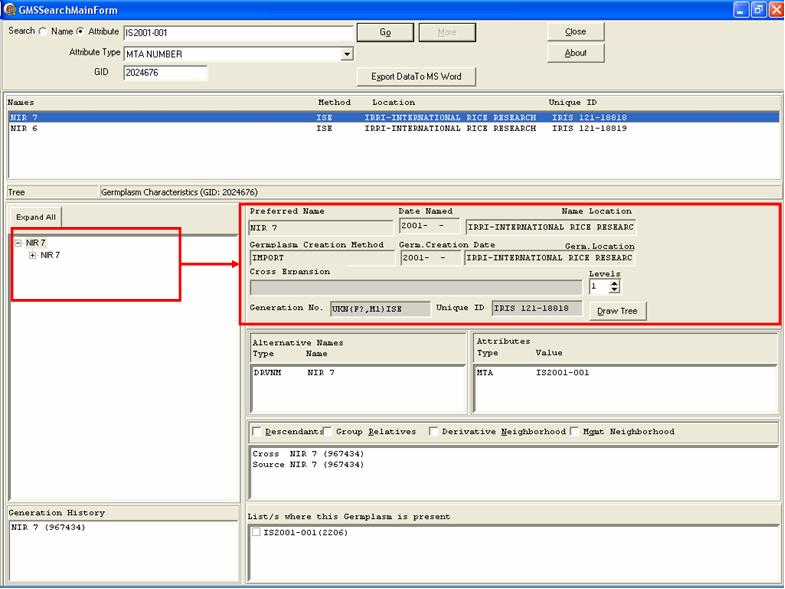
Beside the Cross Expansion is the no. of levels displayed in a spin window. To view a cross expansion at a different level, change the levels counter to the desired value. The cross expansion is displayed up to the no. of levels specified, or the highest no. of levels possible, whichever is lower. On the event that a negative no. is specified, the system shows the preferred name of the selected GID node from the Tree window.
The Alternative Names and Attributes windows displays other names or substitute names, and characteristics or traits, respectively, of the selected node from the Tree window.
The Relatives window displays the relatives of the selected node from the Tree window as well.
The Generation History window displays the origins of the selected node from the Tree window.
The List window displays the lists where the selected node from the Tree window is present.
Searching by GID
To search a germplasm record by GID, type the GID on the space provided.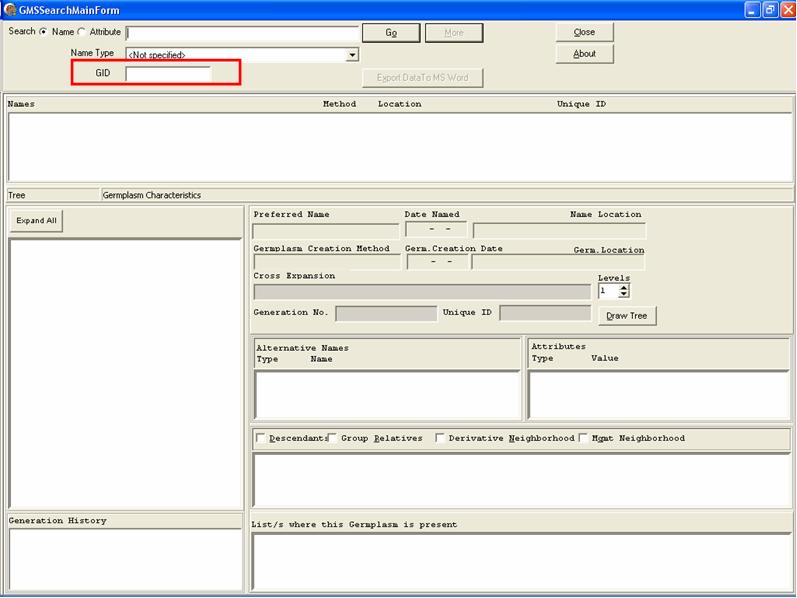
Then Click on the Go button to begin searching.The system displays the record that meets the search criteria. Notice that there is only one record on the Result window. If the specified GID has been replaced with another, the replacement germplasm appears in the Result window instead. This record is selected and its hierarchy is displayed on the Tree window.
The first node on the Tree window is selected and its information is displayed on the Information window.

Beside the Cross Expansion is the no. of levels displayed in a spin window. To view a cross expansion at a different level, change the levels counter to the desired value. The cross expansion is displayed up to the no. of levels specified, or the highest no. of levels possible, whichever is lower. On the event that a negative no. is specified, the system shows the preferred name of the selected GID node from the Tree window.
The Alternative Names and Attributes windows displays other names or substitute names, and characteristics or traits, respectively, of the selected node from the Tree window.
The Relatives window displays the relatives of the selected node from the Tree window as well.
The Generation History window displays the origins of the selected node from the Tree window.
The List window displays the lists where the selected node from the Tree window is present.

Expanding the Tree
The Tree window shows germplasm nodes in a tree structure. This starts with one root germplasm node at the first level, and for each germplasm node it will show if parent/ancestor germplasm nodes exist at the next level going all the way down the structure to the lowest level. Rather than showing the whole structure down to the lowest level in one go it is common practice not to show any child germplasm nodes unless specifically requested.
One Node At A Time
Each germplasm node that has parents/ancestors will have this button next to it:
A germplasm node can be expanded by clicking on the expand button

Note that this button has a toggle effect, which means that once it has been pressed and the task has been completed it will switch to indicate the opposite task.
A germplasm node's parents/ancestors are incuded in the display immediately following it, and they are also indented by one unit in order to better signify the parent/child relationship. Those germplasm nodes which exist at the second level or lower will also have a sign which helps to indicate their parent/ancestor node. If a germplasm node does not have any parent/ancestor then a blank space will be shown instead of an expand button.
All Nodes At One Time
Just above the Tree window is the Expand All button.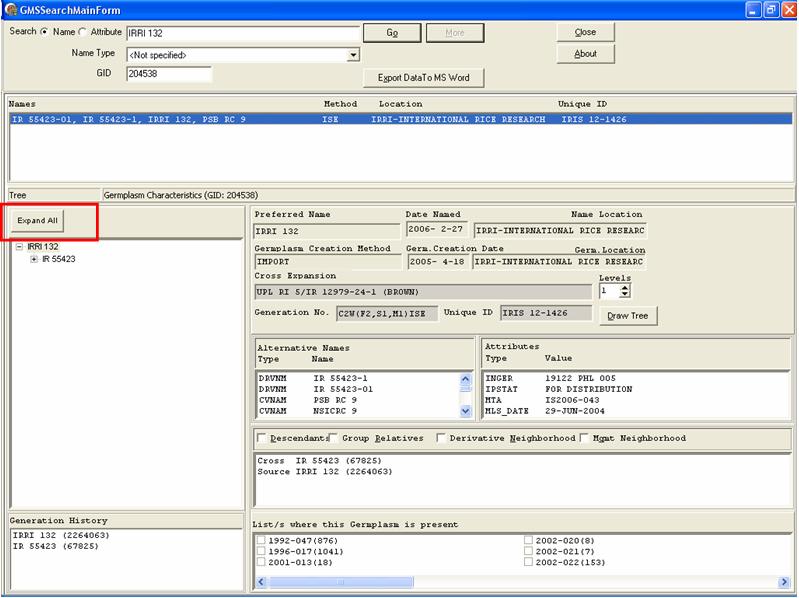
This button, when clicked, spreads out or opens all parent/ancestor germplasm nodes of the Tree window.

Notice that the expand button
Collapsing the Tree
One Node At A Time
Each germplasm node that has been expanded will have this button next to it:
A germplasm node can be collapsed by clicking on the collapse button

Note that this button has a toggle effect, which means that once it has been pressed and the task has been completed it will switch to indicate the opposite task.
A germplasm node's ancestors are removed from the display and the collapsed node will have an expand button
All Nodes At One Time
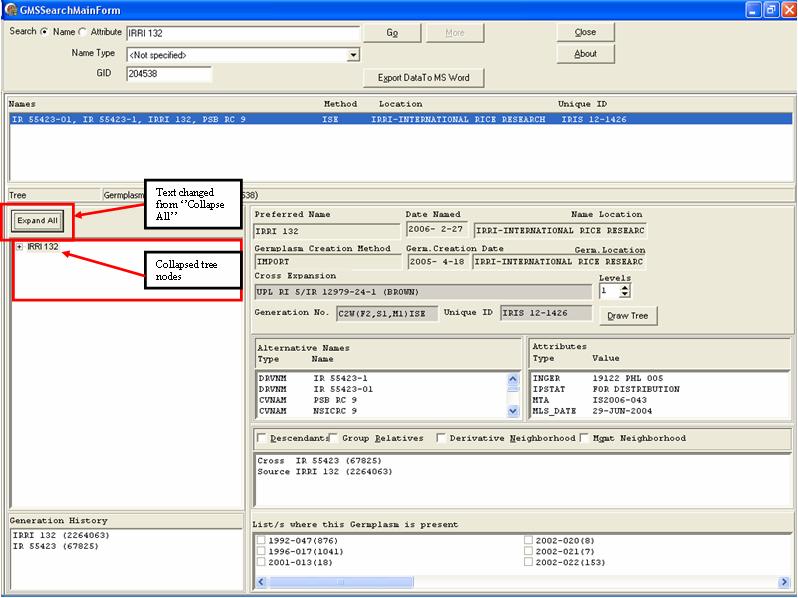
When all nodes of the Tree window is expanded, the button just above it changes its text to Collapse All.
This button, when clicked, folds up or closes all parent/ancestor germplasm nodes of the Tree window.
Notice that the collapse button
Drawing the Tree
The selected item on the Tree window is shown as a report on another window having a different format and content. To view an illustration of the selected item on the Tree window, click on the Draw Tree button located on the Information window.
The TreeFrm window displays.

This window is divided into two sections : (a) the upper panel and (b) the display window, which displays the illustration of the tree.
There are five items on the upper panel:
- The Preferred Name of the selected node from the Tree window is displayed on the left hand side.
- The Number of Generations, located just below the Preferred Name, is displayed in a spin window which sets the level of hierarchy to be shown on the display window, depending on the no. of levels specified, or the highest no. of levels possible, whichever is lower.
- The Show All Names checkbox, when checked, displays all other/substitute names of germplasm records in the tree.
- The Go button shows the report on the the display window.
- The Print button prints the report on paper.

To print the report on paper, click on the Print button.
Retrieving Descendants
After doing a search (please refer to 1.2.1 Searching by Name, 1.2.2 Searching by Attribute, 1.2.3 Searching by GID sections of this file), a germplasm’s sources(parents for a generative method or group and source for a derivative method) are displayed on the Relatives window.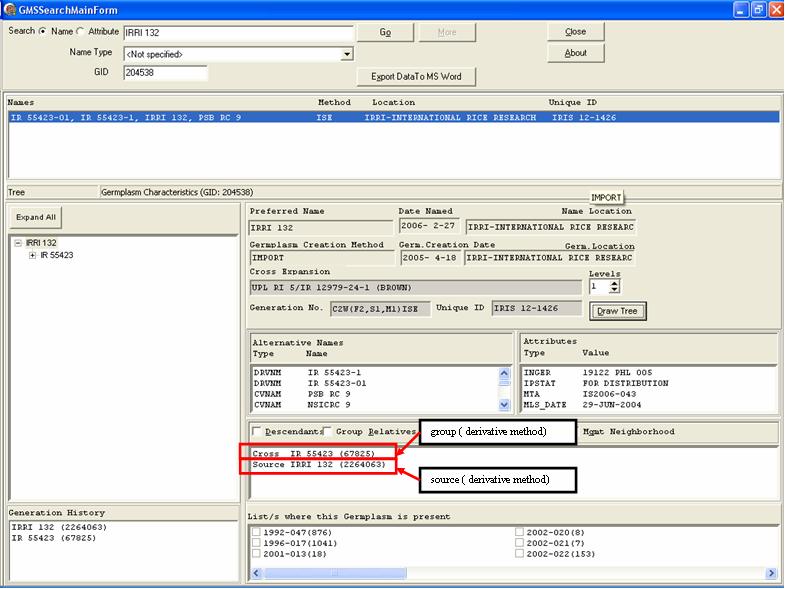
To view the derivatives or offspring of the selected germplasm node from the Tree window, check on the Descendants checkbox on the Relatives window.
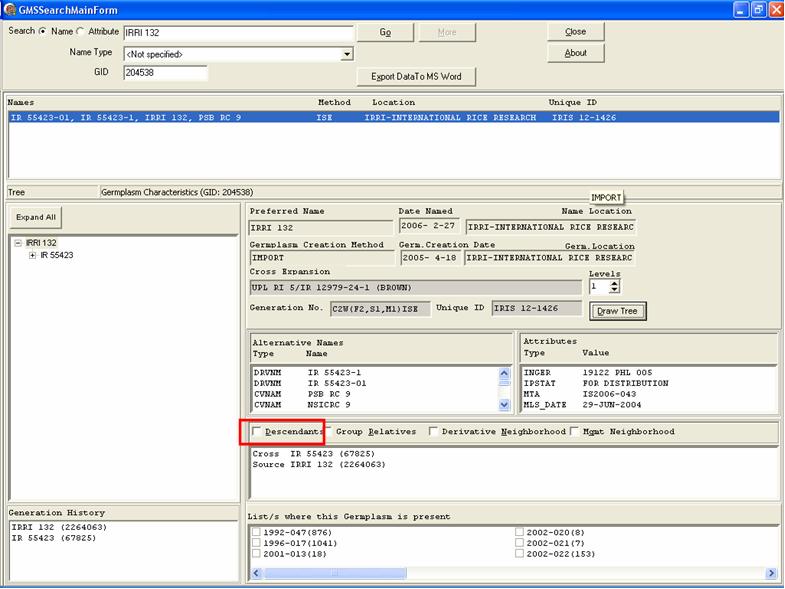
The descendants are then displayed on the Relatives window just below the germplasm's sources.

Retrieving Group Relatives
After doing a search (please refer to 1.2.1 Searching by Name, 1.2.2 Searching by Attribute, 1.2.3 Searching by GID sections of this file), a germplasm’s sources(parents for a generative method or group and source for a derivative method) are displayed on the Relatives window.To view the derivatives or sister lines of the selected germplasm node from the Tree window, check on the Group Relatives checkbox on the Relatives window.
The group relatives are then displayed on the Relatives window just below the germplasm's sources.

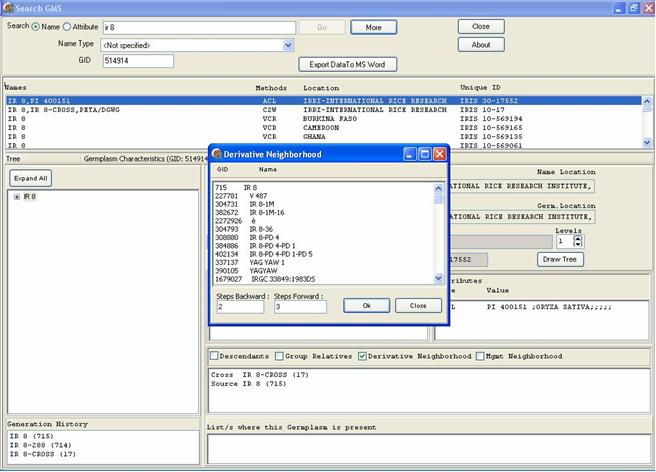
Retrieving Derivative Neighborhood
After doing a search (please refer to 1.2.1 Searching by Name, 1.2.2 Searching by Attribute, 1.2.3 Searching by GID sections of this file), a germplasm’s sources(parents for a generative method or group and source for a derivative method) are displayed on the Relatives window.To view the derivative neighborhood of the selected germplasm node from the Tree window, check on the Derivative Neighbhorhood checkbox on the Relatives window.
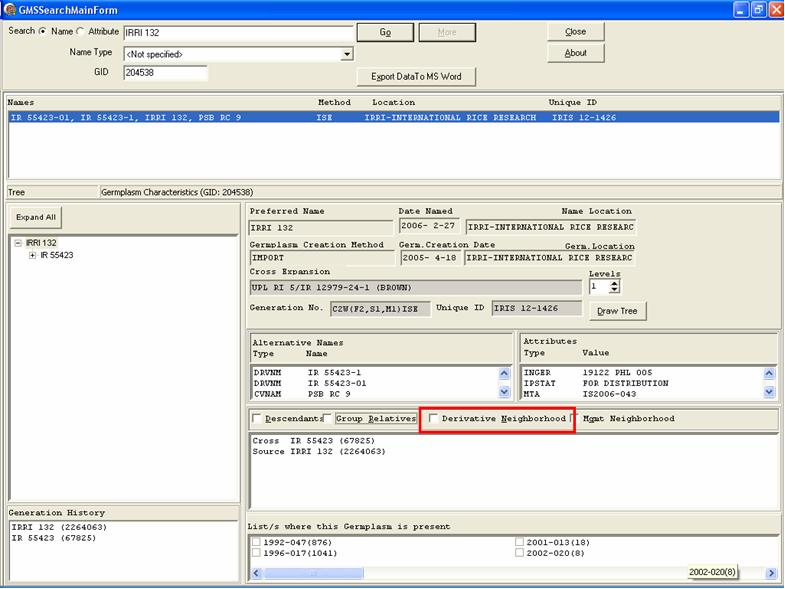
The Derivative Neighbhorhood window displays
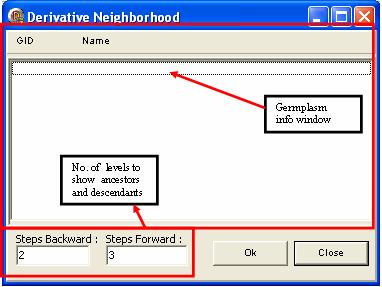
This window is divided into two:
- The Germplasm Information displays all records that are biologically grouped with the selected germplasm node from the Tree window.
- The Steps window sets the (a) no. of levels of ancestors to display on the Germplasm Information window indicated on the Steps Backward box and (b) the no. of levels of descendants to display on the Germplasm Information window indicated on the Steps Forward box.
Set the no. of Steps Backward and no. of Steps Forward on the boxes provided for each. Then click on the Ok button.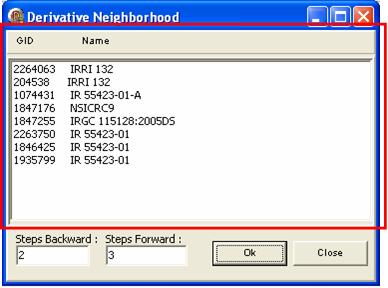
The Germplasm Information window displays the GID and [preferred] Name of the records that meets the criteria specified in the Steps window.
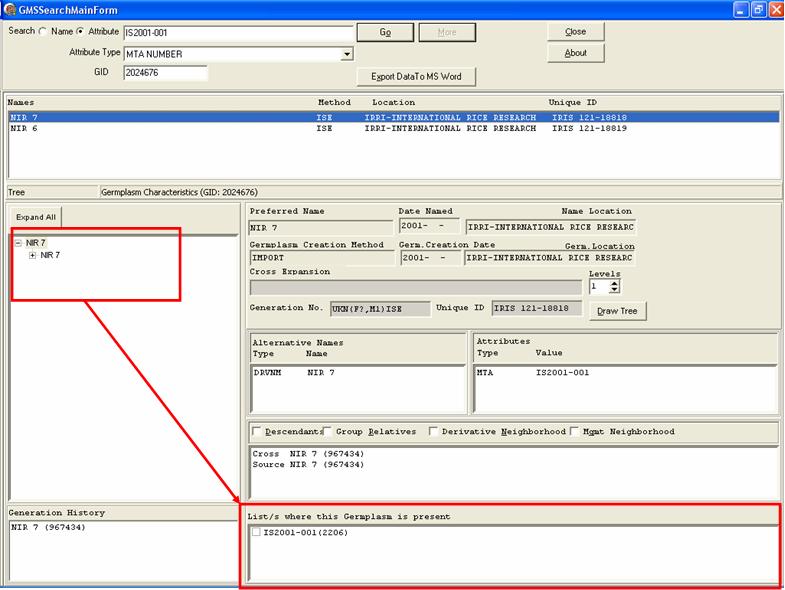
Viewing Characteristics
To view characteristics of a germplasm from the Derivative Neighborhood window, select a record from the Germplasm Information window and right-click on the white space to display a pop-up menu. Select View Characteristics from the pop-up menu.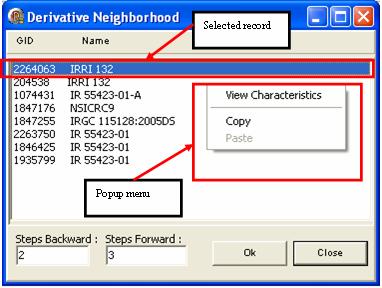
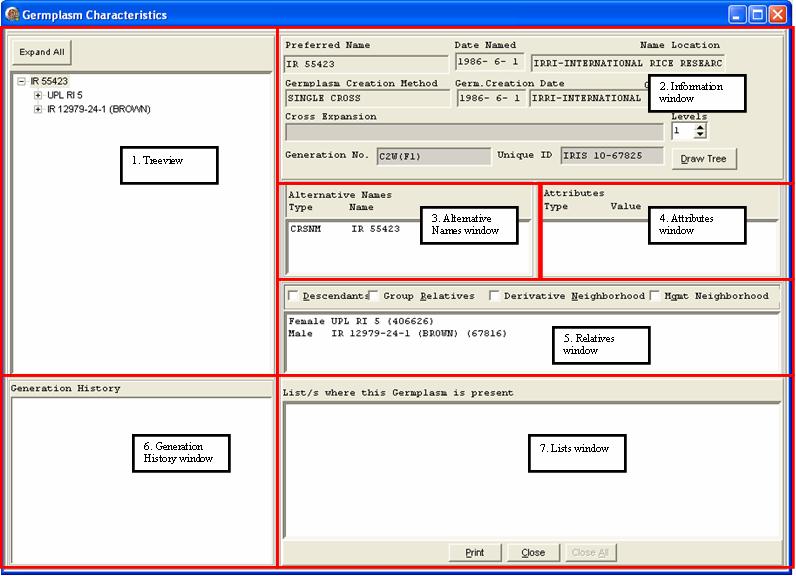
The Germplasm Characteristics window displays.

This window is divided into seven parts:
- The first part is the Tree window, located on the upper-left side of the form, which displays the lineage of the selected record from the Derivative Neighborhood window. Notice that the first record of the Tree window is selected.
- The second part is the Information window, located at the right side of the form, which displays the Preferred Name, Date[when the germplasm is] Named, Name Location[where the germplasm is named], Germplasm Creation Method, Germpl. Creation Date, Germ. Location[where the germplasm is located when named] , Cross Expansion, Generation No.[the germplasm level on the hierarchy] and Unique ID [a combination of the CROP, USERID and local GID assigned to the germplasm] of the selected record from the Tree window.
- The third part is the Alternative Names window, located just below the Information window, which displays other names or substitute names associated (Type and Name) to the selected record from the Tree window.
- The fourth part is the Attributes window, sitting next to the Alternative Names window and below the Information window, displays the characteristics or traits (Type, Value) of the selected record from the Tree window.
- The fifth part is the Relatives window, located below the Alternative Names and Attributes windows, which displays the family of the selected record from the Tree window : the parents(for generative method) or group source(for derivative method), Descendants, Group Relatives, Derivative Neighborhood and Management Neighborhood.
- The sixth part is the Generation History window, located at the bottom-left part of the form, displays the origins of the selected record from the Tree window.
- The seventh part is the Lists window, located on the bottom-right of the form, displays the lists where the record selected from the Tree window is present.
Printing Data
To print the germplasm characteristics displayed on the View Characteristics window, click on the Print button located below the Lists window.
The report is printed on paper.
Copying Data
The Copy and Paste function is one of the most useful and important things a computer can do for a user. The ability to easily move information from one application to another is what a computer does best. These common windows functionality is added to copy information from GMS Search to Windows applications like MSWord, MSExcel and the Notepad.
From the Information window
To copy a single word or phrase from the Information window, double-click on a field and the whole word or phrase from that field is selected. Then right-click on the field to display the pop-up menu.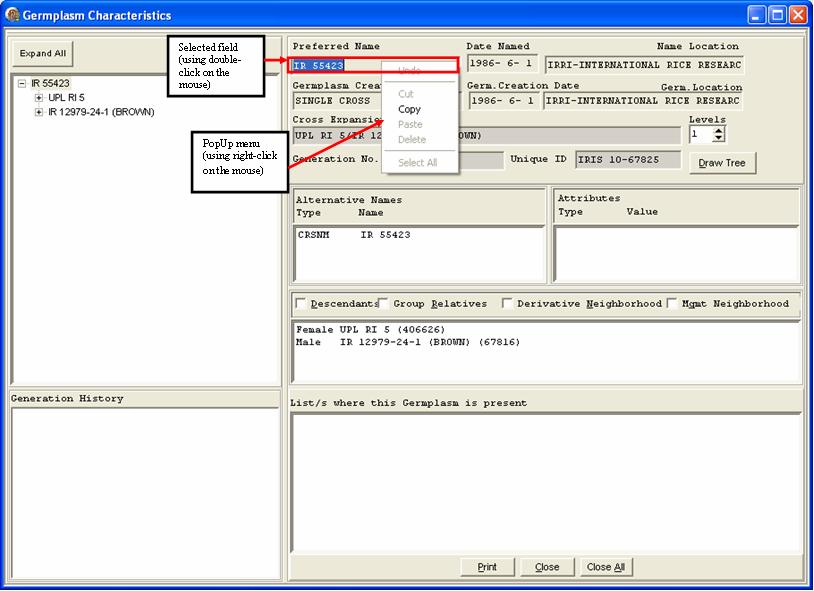
Select Copy from the pop-up menu to copy the selected word or phrase. You can then paste this data on any editing software or application like MSWord, MSExcel or the Notepad for whatever purpose it may serve.
Technical note: When Copying something, it is retained in a part of the computer called the Clipboard. Whatever is copied remains on the clipboard until it is replaced with something else.
From the Alternative Names window
To copy data from the Alternative Names window, select an item from that window. Then right-click on the field to display the pop-up menu.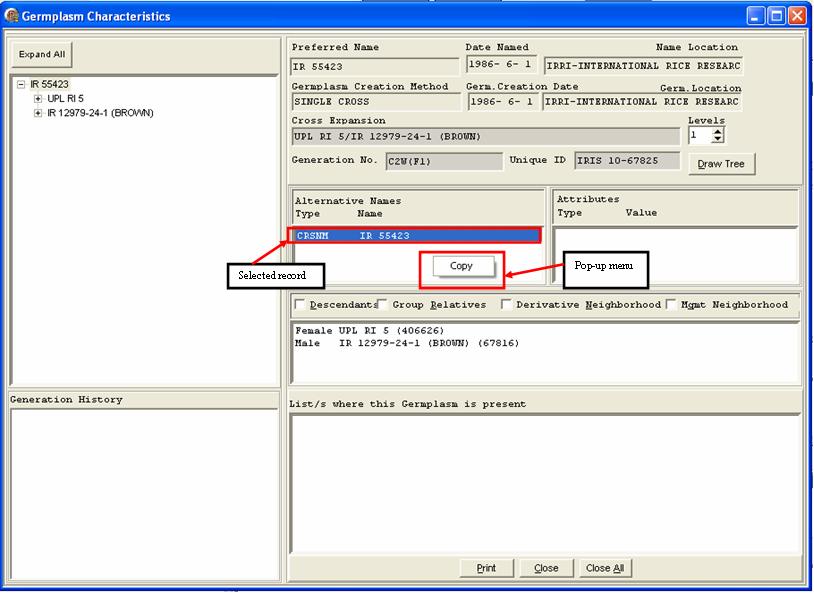
Select Copy from the pop-up menu to copy the data. Take note that only relevant data is copied, in this case, the Name is being copied, leaving the Type behind. You can then paste this data on any editing software or application like MSWord, MSExcel or the Notepad for whatever purpose it may serve.
Technical note: When Copying something, it is retained in a part of the computer called the Clipboard. Whatever is copied remains on the clipboard until it is replaced with something else.
From the Attributes window
To copy data from the Attributes window, select an item from that window. Then right-click on the field to display the pop-up menu.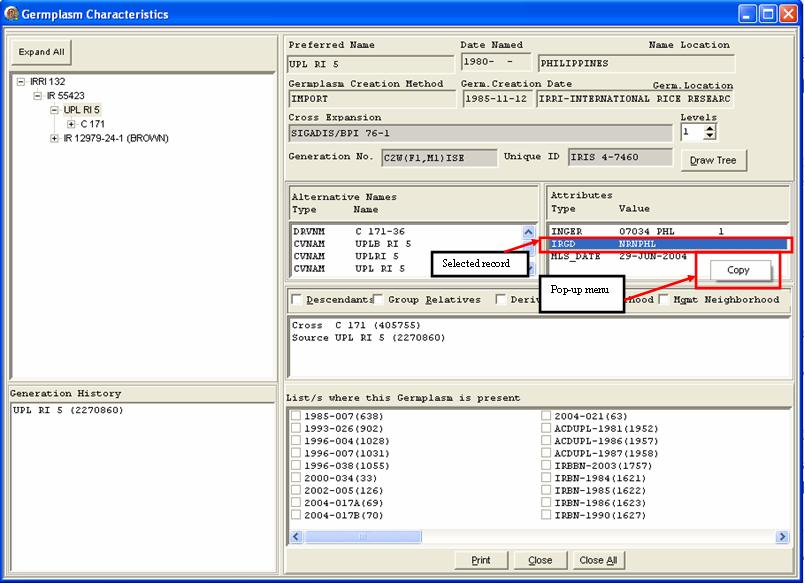
Select Copy from the pop-up menu to copy the data. You can then paste this data on any editing software or application like MSWord, MSExcel or the Notepad for whatever purpose it may serve.
Technical note: When Copying something, it is retained in a part of the computer called the Clipboard. Whatever is copied remains on the clipboard until it is replaced with something else.
From the Relatives window
To copy data from the Relatives window, select an item from that window. Then right-click on the field to display the pop-up menu.
Select Copy from the pop-up menu to copy the data. Take note that only relevant data is copied, in this case, the Preferred Name is being copied, leaving other data behind. You can then paste this data on any editing software or application like MSWord, MSExcel or the Notepad for whatever purpose it may serve.
Technical note: When Copying something, it is retained in a part of the computer called the Clipboard. Whatever is copied remains on the clipboard until it is replaced with something else.
Retrieving Management Neighborhood
After doing a search (please refer to 1.2.1 Searching by Name, 1.2.2 Searching by Attribute, 1.2.3 Searching by GID sections of this file), a germplasm’s sources(parents for a generative method or group and source for a derivative method) are displayed on the Relatives window.
To view the management neighborhood of the selected germplasm node from the Tree window, check on the Mgmt Neighbhorhood checkbox on the Relatives window.
The Management Neighbhorhood window displays

This window displays all records that are under the same management method as that of the selected germplasm node from the Tree window.
Viewing Characteristics
To view characteristics of a germplasm from the Management Neighborhood window, select a record from the Germplasm Information window and right-click on the white space to display a pop-up menu. Select View Characteristics from the pop-up menu.
The Germplasm Characteristics window displays.

This window is divided into seven parts:
- The first part is the Tree window, located on the upper-left side of the form, which displays the lineage of the selected record from the Derivative Neighborhood window. Notice that the first record of the Tree window is selected.
- The second part is the Information window, located at the right side of the form, which displays the Preferred Name, Date[when the germplasm is] Named, Name Location[where the germplasm is named], Germplasm Creation Method, Germpl. Creation Date, Germ. Location[where the germplasm is located when named] , Cross Expansion, Generation No.[the germplasm level on the hierarchy] and Unique ID [a combination of the CROP, USERID and local GID assigned to the germplasm] of the selected record from the Tree window.
- The third part is the Alternative Names window, located just below the Information window, which displays other names or substitute names associated (Type and Name) to the selected record from the Tree window.
- The fourth part is the Attributes window, sitting next to the Alternative Names window and below the Information window, displays the characteristics or traits (Type, Value) of the selected record from the Tree window.
- The fifth part is the Relatives window, located below the Alternative Names and Attributes windows, which displays the family of the selected record from the Tree window : the parents(for generative method) or group source(for derivative method), Descendants, Group Relatives, Derivative Neighborhood and Management Neighborhood.
- The sixth part is the Generation History window, located at the bottom-left part of the form, displays the origins of the selected record from the Tree window.
- The seventh part is the Lists window, located on the bottom-right of the form, displays the lists where the record selected from the Tree window is present.
Printing Data
To print the germplasm characteristics displayed on the View Characteristics window, click on the Print button located below the Lists window.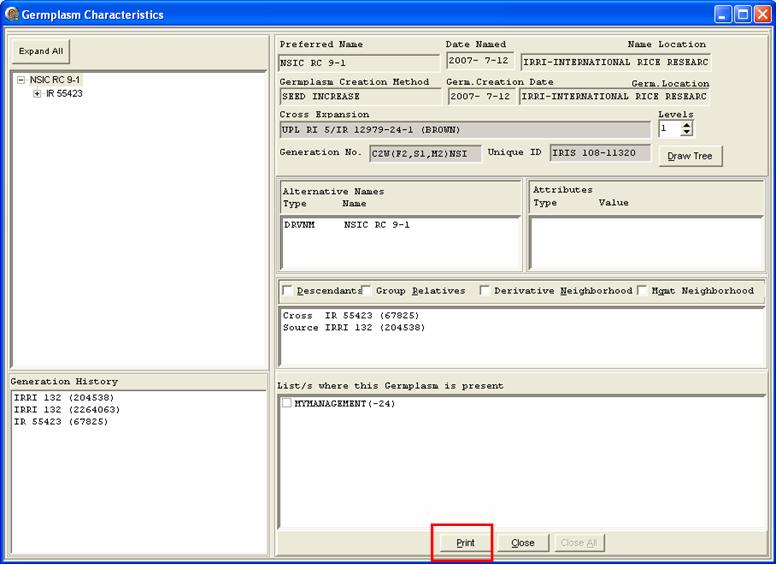
The report is printed on paper.
Copying Data
Copy and Paste are computer functions that allows users to copy information from one application to another. One can copy information to a new application without removing it from the original application. These common windows functionalities are added to copy information from GMS Search to a Windows application like MSWord, MSExcel and the Notepad.
From the Information window
To copy a single word or phrase from the Information window, double-click on a field and the whole word or phrase from that field is selected. Then right-click on the field to display the pop-up menu.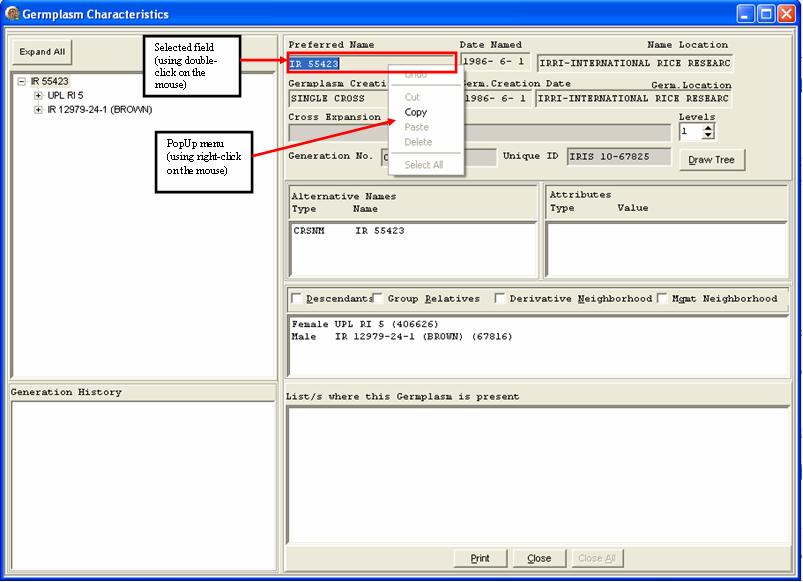
Select Copy from the pop-up menu to copy the selected word or phrase. You can then paste this data on any editing software or application like MSWord, MSExcel or the Notepad for whatever purpose it may serve.
Technical note: the information is stored in the computer's memory in an area called the Clipboard. Although the information is unseen, it remains in the Clipboard until the Copy command is used again, at which time the information that was previously in the Clipboard is overwritten with the latest information that was just copied.
From the Alternative Names window
To copy data from the Alternative Names window, select an item from that window. Then right-click on the field to display the pop-up menu.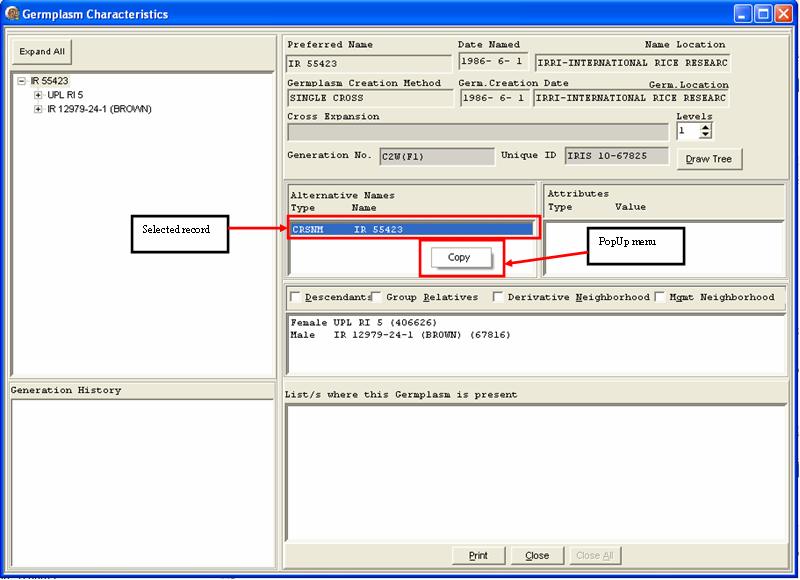
Select Copy from the pop-up menu to copy the data. Take note that only relevant data is copied, in this case, the Name is being copied, leaving the Type behind. You can then paste this data on any editing software or application like MSWord, MSExcel or the Notepad for whatever purpose it may serve.
Technical note: the information is stored in the computer's memory in an area called the Clipboard. Although the information is unseen, it remains in the Clipboard until the Copy command is used again, at which time the information that was previously in the Clipboard is overwritten with the latest information that was just copied.
From the Attributes window
To copy data from the Attributes window, select an item from that window. Then right-click on the field to display the pop-up menu.
Select Copy from the pop-up menu to copy the data. You can then paste this data on any editing software or application like MSWord, MSExcel or the Notepad for whatever purpose it may serve.
Technical note: the information is stored in the computer's memory in an area called the Clipboard. Although the information is unseen, it remains in the Clipboard until the Copy command is used again, at which time the information that was previously in the Clipboard is overwritten with the latest information that was just copied.
From the Relatives window
To copy data from the Relatives window, select an item from that window. Then right-click on the field to display the pop-up menu.
Select Copy from the pop-up menu to copy the data. Take note that only relevant data is copied, in this case, the Preferred Name is being copied, leaving other data behind. You can then paste this data on any editing software or application like MSWord, MSExcel or the Notepad for whatever purpose it may serve.
Technical note: the information is stored in the computer's memory in an area called the Clipboard. Although the information is unseen, it remains in the Clipboard until the Copy command is used again, at which time the information that was previously in the Clipboard is overwritten with the latest information that was just copied.
Copying Data
Often times a user will need to move text from one application to another. Through the Copy and Paste functions, sharing of information between applications is made possible. This common windows functionality is added to copy information from GMS Search to Windows applications like MSWord, MSExcel and the Notepad.
From the Information window
To copy a single word or phrase from the Information window, double-click on a field and the whole word or phrase from that field is selected. Then right-click on the field to display the pop-up menu.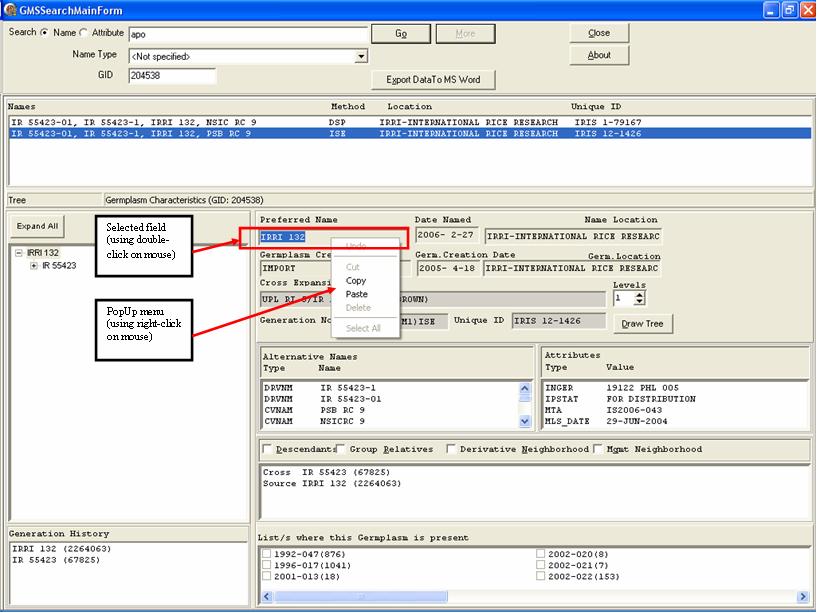
Select Copy from the pop-up menu to copy the selected word or phrase. You can then paste this data on any editing software or application like MSWord, MSExcel or the Notepad for whatever purpose it may serve.
Technical note: the information is stored in the computer's memory in an area called the Clipboard. Although the information is unseen, it remains in the Clipboard until the Copy command is used again, at which time the information that was previously in the Clipboard is overwritten with the latest information that was just copied.
From the Alternative Names window
To copy data from the Alternative Names window, select an item from that window. Then right-click on the field to display the pop-up menu.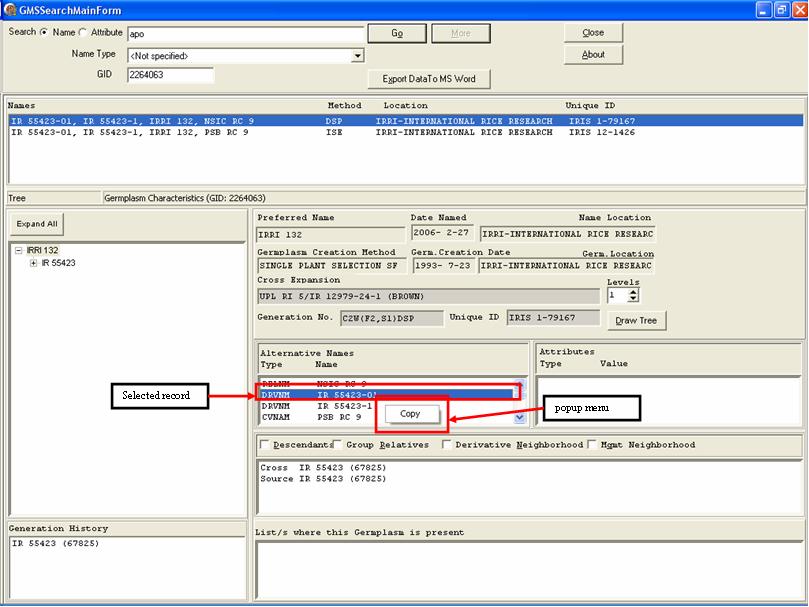
Select Copy from the pop-up menu to copy the data. Take note that only relevant data is copied, in this case, the Name is being copied, leaving the Type behind. You can then paste this data on any editing software or application like MSWord, MSExcel or the Notepad for whatever purpose it may serve.
Technical note: the information is stored in the computer's memory in an area called the Clipboard. Although the information is unseen, it remains in the Clipboard until the Copy command is used again, at which time the information that was previously in the Clipboard is overwritten with the latest information that was just copied.
From the Attributes window
To copy data from the Attributes window, select an item from that window. Then right-click on the field to display the pop-up menu.
Select Copy from the pop-up menu to copy the data. You can then paste this data on any editing software or application like MSWord, MSExcel or the Notepad for whatever purpose it may serve.
Technical note: the information is stored in the computer's memory in an area called the Clipboard. Although the information is unseen, it remains in the Clipboard until the Copy command is used again, at which time the information that was previously in the Clipboard is overwritten with the latest information that was just copied.
From the Relatives window
To copy data from the Relatives window, select an item from that window. Then right-click on the field to display the pop-up menu.
Select Copy from the pop-up menu to copy the data. Take note that only relevant data is copied, in this case, the Preferred Name is being copied, leaving other data behind. You can then paste this data on any editing software or application like MSWord, MSExcel or the Notepad for whatever purpose it may serve.
Technical note: the information is stored in the computer's memory in an area called the Clipboard. Although the information is unseen, it remains in the Clipboard until the Copy command is used again, at which time the information that was previously in the Clipboard is overwritten with the latest information that was just copied.
Viewing Characteristics
From the Generation History window
To view characteristics of a germplasm from the Generation History window, select a record and right-click on the white space to display a pop-up menu. Select View Characteristics from the pop-up menu.
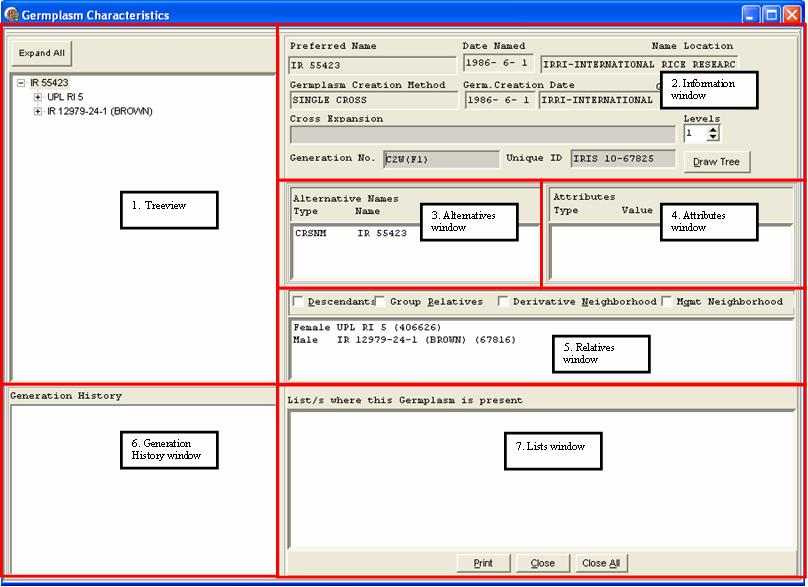
The Germplasm Characteristics window displays.
This window is divided into seven parts:
- The first part is the Tree window, located on the upper-left side of the form, which displays the lineage of the selected record from the Generation History window. Notice that the first record of the Tree window is selected.
- The second part is the Information window, located at the right side of the form, which displays the Preferred Name, Date[when the germplasm is] Named, Name Location[where the germplasm is named], Germplasm Creation Method, Germpl. Creation Date, Germ. Location[where the germplasm is located when named] , Cross Expansion, Generation No.[the germplasm level on the hierarchy] and Unique ID [a combination of the CROP, USERID and local GID assigned to the germplasm] of the selected record from the Tree window.
- The third part is the Alternative Names window, located just below the Information window, which displays other names or substitute names associated (Type and Name) to the selected record from the Tree window.
- The fourth part is the Attributes window, sitting next to the Alternative Names window and below the Information window, displays the characteristics or traits (Type, Value) of the selected record from the Tree window.
- The fifth part is the Relatives window, located below the Alternative Names and Attributes windows, which displays the family of the selected record from the Tree window : the parents(for generative method) or group source(for derivative method), Descendants, Group Relatives, Derivative Neighborhood and Management Neighborhood.
- The sixth part is the Generation History window, located at the bottom-left part of the form, displays the origins of the selected record from the Tree window.
- The seventh part is the Lists window, located on the bottom-right of the form, displays the lists where the record selected from the Tree window is present.
From the Relatives window
To view characteristics of a germplasm from the Relatives window, select a record and right-click on the white space to display a pop-up menu. Select View Characteristics from the pop-up menu.
The Germplasm Characteristics window displays.
This window is divided into seven parts:
- The first part is the Tree window, located on the upper-left side of the form, which displays the lineage of the selected record from the Relatives window. Notice that the first record of the Tree window is selected.
- The second part is the Information window, located at the right side of the form, which displays the Preferred Name, Date[when the germplasm is] Named, Name Location[where the germplasm is named], Germplasm Creation Method, Germpl. Creation Date, Germ. Location[where the germplasm is located when named] , Cross Expansion, Generation No.[the germplasm level on the hierarchy] and Unique ID [a combination of the CROP, USERID and local GID assigned to the germplasm] of the selected record from the Tree window.
- The third part is the Alternative Names window, located just below the Information window, which displays other names or substitute names associated (Type and Name) to the selected record from the Tree window.
- The fourth part is the Attributes window, sitting next to the Alternative Names window and below the Information window, displays the characteristics or traits (Type, Value) of the selected record from the Tree window.
- The fifth part is the Relatives window, located below the Alternative Names and Attributes windows, which displays the family of the selected record from the Tree window : the parents(for generative method) or group source(for derivative method), Descendants, Group Relatives, Derivative Neighborhood and Management Neighborhood.
- The sixth part is the Generation History window, located at the bottom-left part of the form, displays the origins of the selected record from the Tree window.
- The seventh part is the Lists window, located on the bottom-right of the form, displays the lists where the record selected from the Tree window is present.
Viewing Inventory Entries
Through the GMS Search, tracking and knowing the value of inventory and quantity of seed is made possible. To view inventory information, select a GID node from the Tree window, click on a list from the Lists window, then right-click on the white space to display pop-up menu.
Select Show Inventory entry/ies from the popup menu.
The Inventory Tracker window displays.

This window is divided into three parts:
- The first part is the List Selector window which is located on the left window panel. This window displays the lists in tree form, where a list can be a parent or a child of another list. Notice that the selected list from the Lists window of GMS Search is highlighted in this window.
- The second part is the List Data window located at the upper right-hand window panel. This window displays the germplasm information of selected GID node from Tree window.
- The third part is the Inventory Details window where the inventory information of the selected germplasm is displayed. The information on this window are : the Tag column sets which row/s the user has selected by clicking on the row/tag column combination. An x mark is displayed for tagged rows; the GID column is the unique identifier of a germplasm which populated by the system; the Germplasm Bank Accession column displays the Accession number of a germplasm. Take Note that this column's name and data changes depending on what type is specidied in the [IMS]- NTYPE section of the INI file, for example, it can be named Designation and the designation of the germplasm is displayed or it can be named IRTP name and the IRTP name is displayed; the LotID column is the unique number assigned to each inventory Lot, where a Lot is a combination of GID, Location and Scale;the Lot Location column displays the location of the germplasm in the stock room; the Lot Units column displays the scale used in weighing the germplasm;the Available Balance column displays the actual amount inside the stock room plus/minus the deposit/reserved amount, respectively; the Actual Balance column displays the exact amount that is in storage; the Remarks column displays any comments set by the user upon adding lots; and the No. of Reserves column displays the number of reservations for a germplasm.
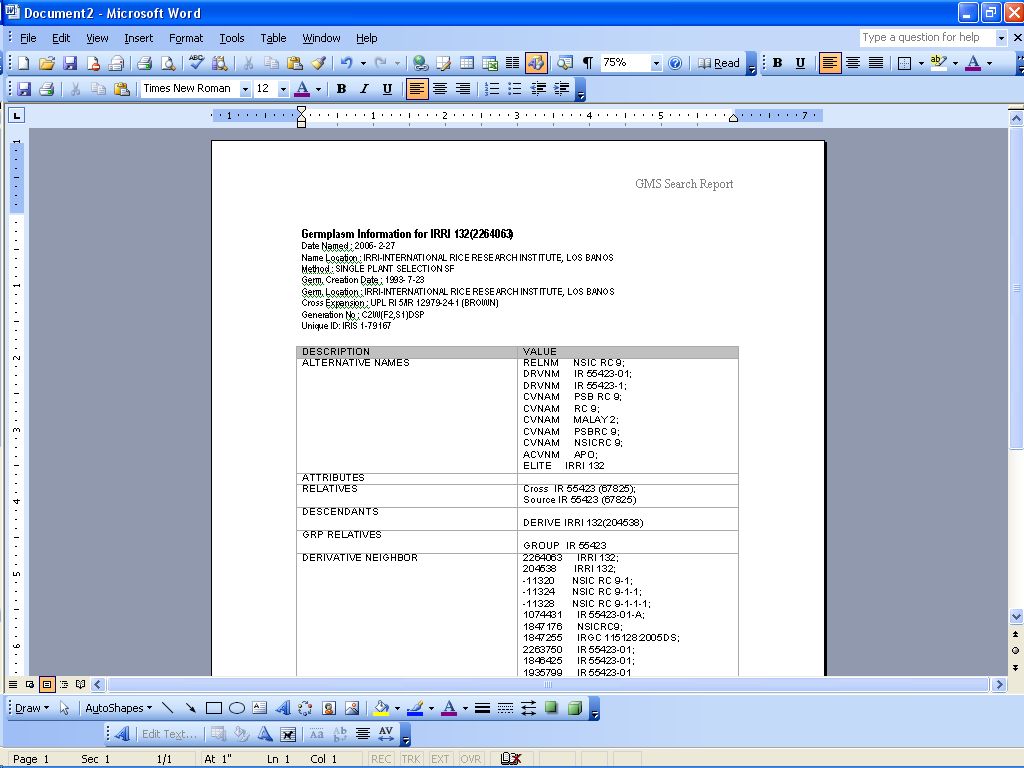
Exporting Data to MS Word
Information displayed on the GMS Search window is better appreciated if it were to be saved on a format that is familiar to the user. The ability to save information on MS Word format is made possible by clicking on the Export Data to MS Word button on the Search Criteria window.
The MSWord application opens, creating a new document and displaying information from the GMS Search window.