TDM ICIS Workbook 5.5
From ICISWiki
New Features
About ICISworkbook ver.5.5.1.0
The About ICISworkbook dialog interface received a facelift to show the release license of the application as well as provide clickable links to resource sites.
About ICISworkbook dialog interface
User-Defined Study Types
The hard-coded STUDY TYPE values are now customizable as user-defined entries with ICISworkbook ver.5.5.1. This is done by storing the values in the UDFLDS table of the local database with the following entries:
  FTABLE  FTYPE   FCODE  FNAME       FFMT  FDESC  LFLDNO  FUID  FDATE  SCALEID

  STUDY   STYPE   E      Experiment  -     -      0       0     0      0
  STUDY   STYPE   N      Nursery     -     -      0       0     0      0
  STUDY   STYPE   S      Survey      -     -      0       0     0      0
  STUDY   STYPE   M      SMTA        -     -      0       0     0      0
  STUDY   STYPE   G      Genotype    -     -      0       0     0      0
  STUDY   STYPE   Q      QTL         -     -      0       0     0      0
Naming Datasets
The capability to store and display dataset names rather than the old list of factors used in the dataset is now possible with ICISworkbook ver.5.5.1. This is done by specifying the name for each dataset (or representation) in the cells next to the LABEL column header of the FACTOR section. Then each factor and variate variable involved in a particular representation must have a corresponding entry (any value) in the adjacent cell under the appropriate dataset column. If no representation was specified, all the factors and variates fall under one dataset and the usual list of factors will be displayed in lieu of the dataset name.
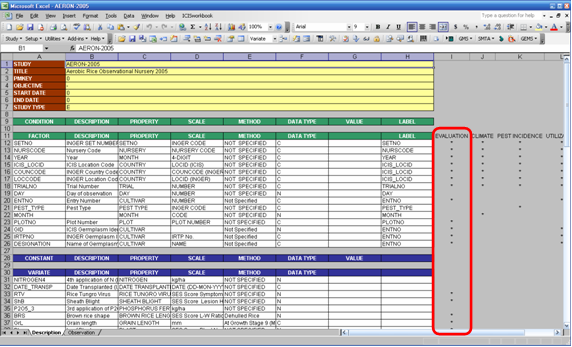
Multiple representations (datasets) with user-defined names
Truncated Views of Numeric Entries
Added as one of the check routines is the checking for truncated views of numeric entries. This occurs when a column width is smaller than its longest numeric entry which prompts Excel to display a rounded value where the actual value of the cell (that which gets recorded in the database) remains in its original precision. This check spots for precision outliers which enables the user to specify his prefered precision before the data gets loaded into the database. Enabling this check routine requires an INI key entry "WarnTruncNum=True".
GMS Names/Attributes Batch Upload
Three new GMS functions have been added into ICISworkbook:
Add As Name - upload the values in the selected Observation sheet column as names associated with the GID entries.
Add As Attribute - upload the values in the selected Observation sheet column as attributes associated with the GID entries.
Get Attribute - fill the selected Observation sheet column with the specified attribute based on the GID entries.
Like the rest of the GMS functions, the application automatically locates the GID column to supply the input parameter, and the user needs to select a cell in the column whose contents will be uploaded as names/attributes or the column that would receive the retrieved information.
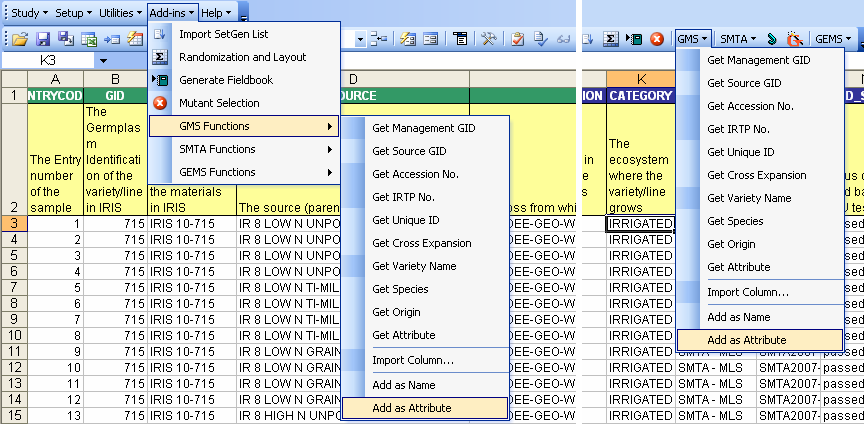
Add as Attribute menu and toolbar icon
When the corresponding menu or toolbar icon is clicked, a user interface gets launched for the user to select the name/attribute that identifies the information or create a new one if no appropriate name/attribute already exists.
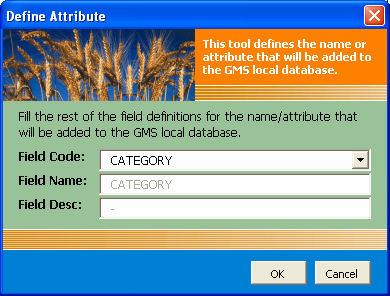
Add as Attribute user interface
In relation to these batch uploads, the part of the Convert Excel File wizard where the columns are segregated into Factors and Variates has been redesigned to add two more groupings: Names and Attributes. The underlying functions were updated to create four additional sheets for entering information about user-defined names and attributes as well as to contain the name and attribute entries taken from the source Excel file.
Condition Variables in the File Conversion Wizard
The dialog interface in the Convert Excel File wizard where the STUDY NAME and TITLE are being asked was redesigned to include the definition of possible CONDITION variables that are located on top of the row containing the column headers. The user can simply drag and drop items from the list and may even use the CTRL or SHIFT key to do multiple selection. Double-clicking an item in the Conditions list will bring it back to the source list.
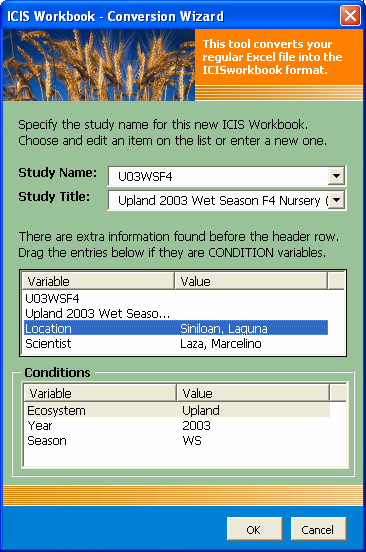
Specifying Condition variables in the Convert Excel File wizard
Split Workbook
A new menu and toolbar icon "Split Workbook" which allows a workbook file with multiple pairs of Description and Observation sheets to be splitted into each pair's own workbook file has been added into ICISworkbook. Two new INI keys were supported "DesShtName" and "ObsShtName" to accomodate customized names for the two major worksheets. If these INI keys are not found, the application defaults to "Description" and "Observation" as the worksheet names. The function also checks for the required structure of the ICIS workbook file and reports missing components.
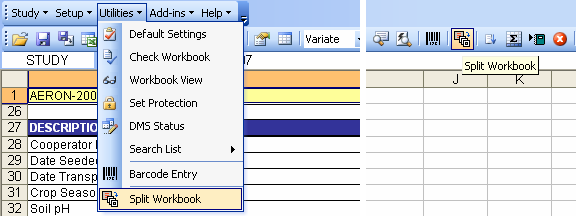
Utilities → Split Workbook menu and toolbar icon

Multiple pairs of Description and Observation sheets

INI key entries for alternative names of the Description and Observation sheets
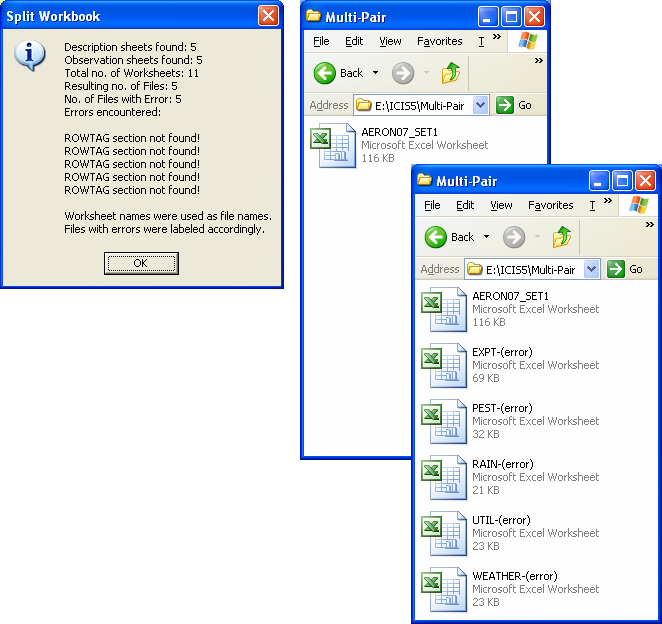
Reporting the result of the Split Workbook operation
Mutant Selection
This is a specialized function used by the IR64 Mutant Rice Team at IRRI. The Add-ins → Mutant Selection menu or the equivalent toolbar icon creates an ICIS Workbook by filling-up a workbook template with data coming from a Mutant Selection File, and retrieving the associated list data from a specified SetGen List. The Mutant Selection File is a regular Excel file containing in the first sheet at least three columns: [1] the mutant name, [2] the phenotypic ID, and [3] the selected plant numbers.
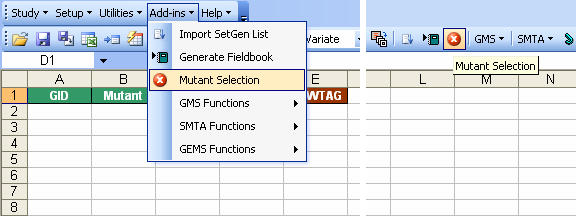
Add-ins → Mutant Selection menu and toolbar icon
The first requirement is the corresponding workbook template. Normally, you would first open the workbook template before clicking on the menu. But if there's no open workbook yet, the application will launch the Open dialog interface to ask for the name and location of the template file.

Open dialog interface asking for the Mutant Workbook Template if there's no active workbook yet
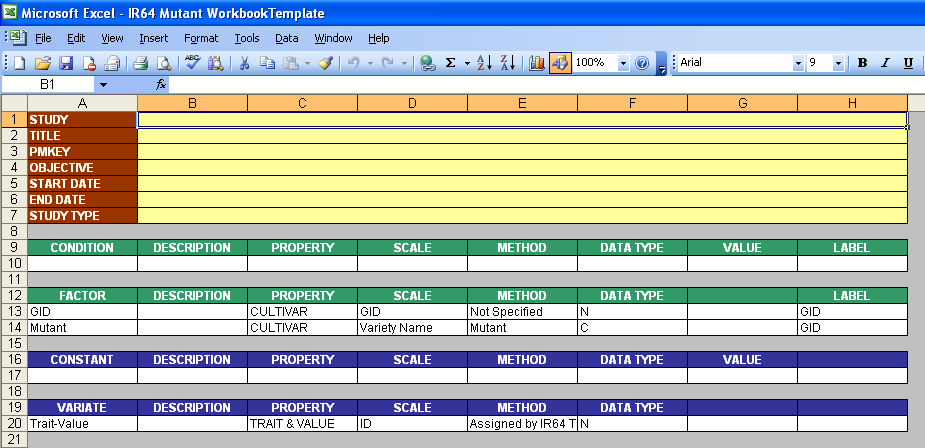
Description Sheet of the Mutant Workbook Template
If there's already an active workbook, the Mutant Selection dialog interface will appear where the user must specify the necessary column mappings in order to fill-up the workbook template. The step-by-step procedures to setup the form are as follows:
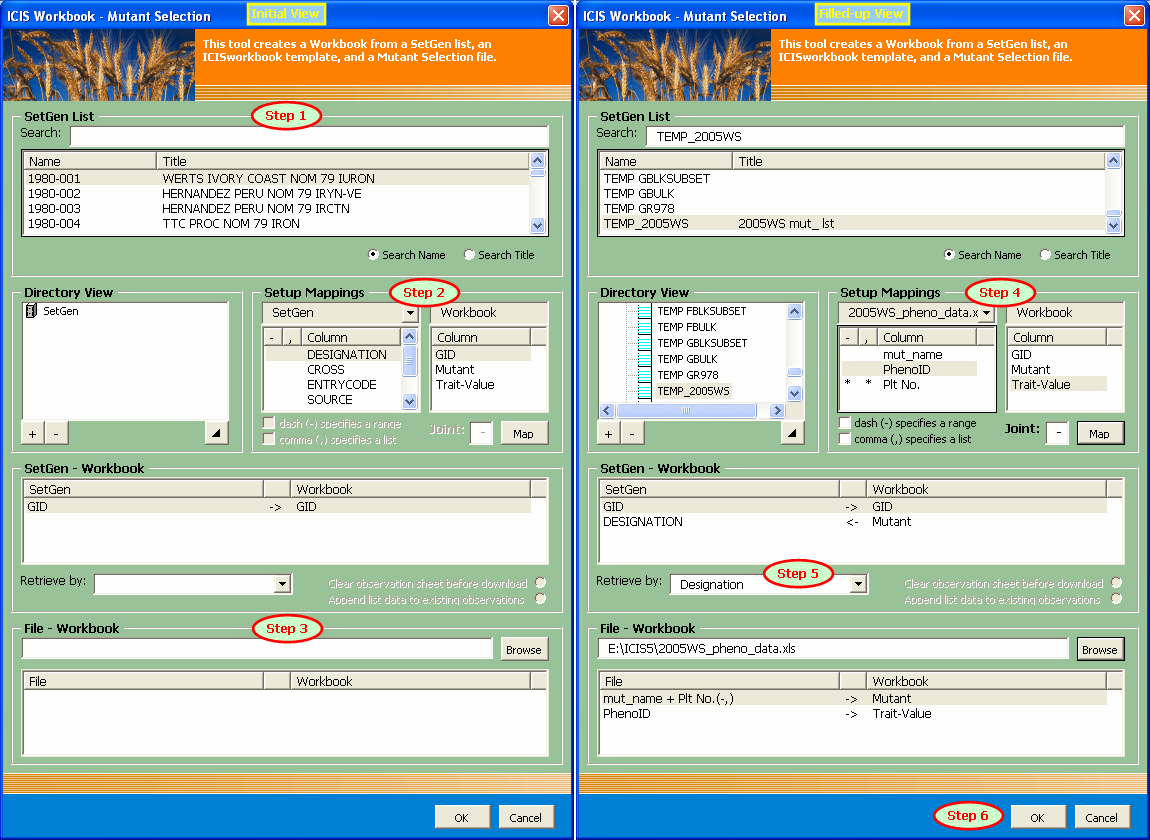
Mutant Selection dialog interface highlighting the numbered steps to setup the form
Step 1. Select the SetGen List
As you type along the name of the SetGen List in the corresponding textbox, an auto-search is being conducted to select the matching list items below, depending on the ticked search option. "Search Name" is the default option, meaning that the characters typed are being compared against the List Names. If "Search Title" is selected, the user can search for the List Title instead. Such option enables the user to find a particular SetGen List in case the title is easier to remember than the name because generally, names are coded while titles are more descriptive.
Step 2. Setup the SetGen - Workbook column mappings
The Setup Mappings section of the form provides the controls to map the SetGen - Workbook columns. The standard SetGen columns are shown on the left while the available Workbook columns are shown on the right side. The user must select the pair of columns and click on the Map button to make the link. The SetGen - Workbook section of the form shows the created link. It's possible that there are already created links at the initial launch of the form. This was automatically generated by the application using a specialized algorithm and available information for the user's convenience.
Step 3. Specify the Mutant Selection File
If you know the complete path and name of the Mutant Selection File, you can immediately type it in the textbox provided. By pressing the Enter key at the end, the path will be verified by the application. However, the file is probably located far away from the root drive, thus it is better to use the Browse button. The Open dialog interface will be launched to ask for the Mutant Selection File.
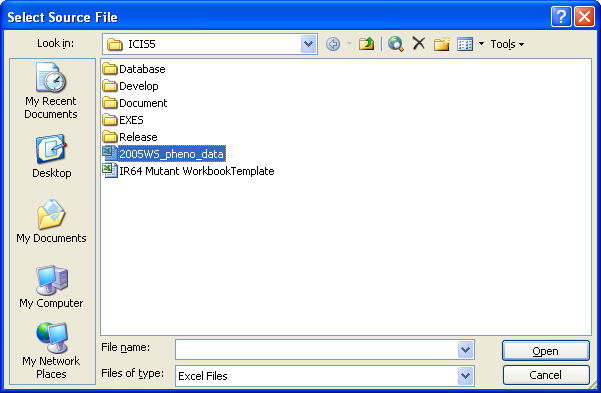
Open dialog interface asking for the Mutant Selection File

Mutant Selection File
Step 4. Setup the File - Workbook column mappings
Once the file name and path has been verified by the application, the file name will be added as the second choice of the combobox in the Setup Mappings section of the form. The user must then select this choice and consequently, the list of available columns in the Mutant Selection file will replace the list of standard SetGen columns. Again the user must select the pair of File - Workbook columns and click on the Map button to create the link. However, there are special controls that are enabled when the Mutant Selection File is selected in the combobox. These are two checkboxes for specifying whether a dash or commas contained in the selected File column will be interpreted as symbols for a range or a list of values respectively. Also, multiple columns in a Mutant Selection File can be combined together to be mapped to a single Workbook column. A textbox where the user can specify the "joint" character(s) is also enabled. Multiple selection of File columns can be done by pressing down the Ctrl key while selecting the columns to be joined. The File - Workbook section of the form will show the generated link.
Step 5. Select the basis of retrieval for the SetGen List
You will notice in both the SetGen - Workbook and File - Workbook sections that there is a middle column that shows the data flow. By default, the left column is the source and the right column is the destination. But to establish the connection between the File data and the SetGen list data, a basis of retrieval for the SetGen list must be specified through a combobox in the SetGen - Workbook section of the form. By selecting a basis column, the corresponding data flow for the pair of columns will change accordingly.
Step 6. Press the OK button to execute
If the previous steps have all been performed, what's left is to click on the OK button to fill-up the workbook template, and the resulting workbook will be ready for loading.
Import SetGen List
The Import SetGen List user interface has been modified to reuse the form being used in the Mutant Selection interface. Aside from reusing objects, the primary purpose of the new design is to easily accomodate the addition of new SetGen columns regardless of the number which the old interface cannot handle. Furthermore, the new interface now allows searching for the List Title.

Comparison of the old and new Import SetGen List user interface
Randomization and Layout
A new user interface and its corresponding functions called the Randomization and Layout form have been added to the ICISworkbook. This provides integration of some statistical functionalities from the CropStat application by making use of that application's "BSTAT32.dll". This DLL must be available on the ICIS\EXES installation directory.

Add-ins → Randomization and Layout menu and toolbar icon
The Randomization and Layout menu or toolbar icon launches the corresponding user interface.
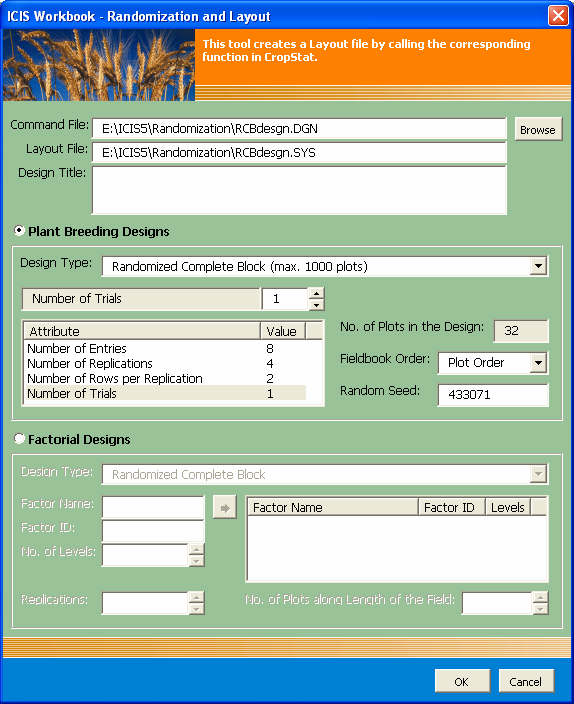
Randomization and Layout user interface
The step-by-step procedures to setup the form are as follows:
Step 1. Specify the path and file names of the Command and Layout files
Type the path on the textbox provided or use the Browse button to navigate through the directories to ensure a valid path. There is however an 8-character limit on the file names as imposed by the BSTAT32.dll functions. Nevertheless, the application performs validations on these requested paths. If the user opts to use the Browse button, only the Command file needs to be specified and the application automatically uses the same file name but with a different extension for the Layout file.
Step 2. Choose the design type
Currently, only the Plant Breeding Designs have the corresponding functions available in BSTAT32.dll. The functions for the Factorial Designs are written inside the CropStat application and is yet to be transferred to the DLL. There are two available design types for Plant Breeding Designs, these are the RCB and Alpha-Lattice.
Step 3. Set the design parameters
The design parameters changes alongside the chosen design type. A list control was used to accomodate this dynamic behavior. To edit the value of a certain parameter, the user must select the parameter from the list items and type-in a new value on the textbox provided, or use the spin buttons to adjust the current value. The numeric seed used in the randomization is made available for the user to change on demand should a certain random order needs to be re-generated.
Step 4. Press the OK button to execute
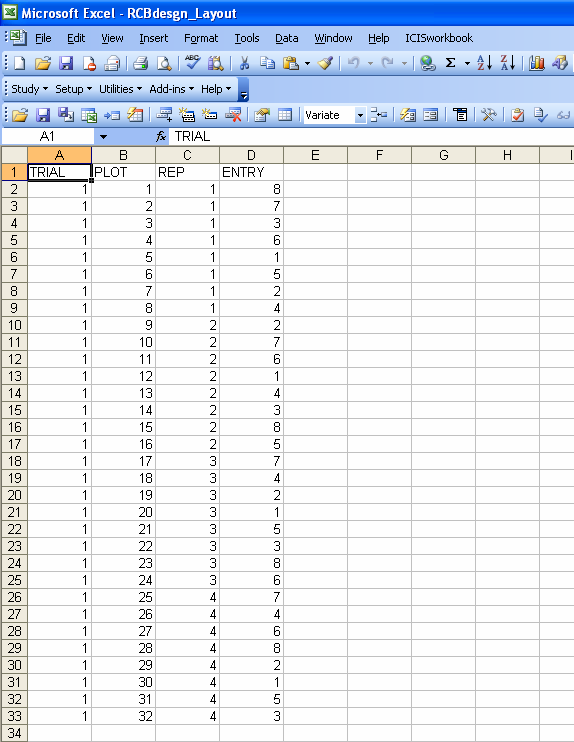
Resulting Layout file
Valid Values
The Valid Values user interface has been modified to show the manually-populated values in the SCALEDIS table. This user interface was developed initially as a means of performing data validation during the time when access to the SCALECON and SCALEDIS tables where not yet available. User-specified valid values using this interface are saved on the current workbook file when the Apply Validation button is pressed.
However, while the question on who has authority to set or modify valid values in the database remains unsettled given the possible disruption of workflow when authorized individuals cannot be easily reached, the significance of this user interface is still evident. Moreover, an arising need to be able to identify outliers not necessarily out of the valid values scale gives more reason to further develop this user interface.
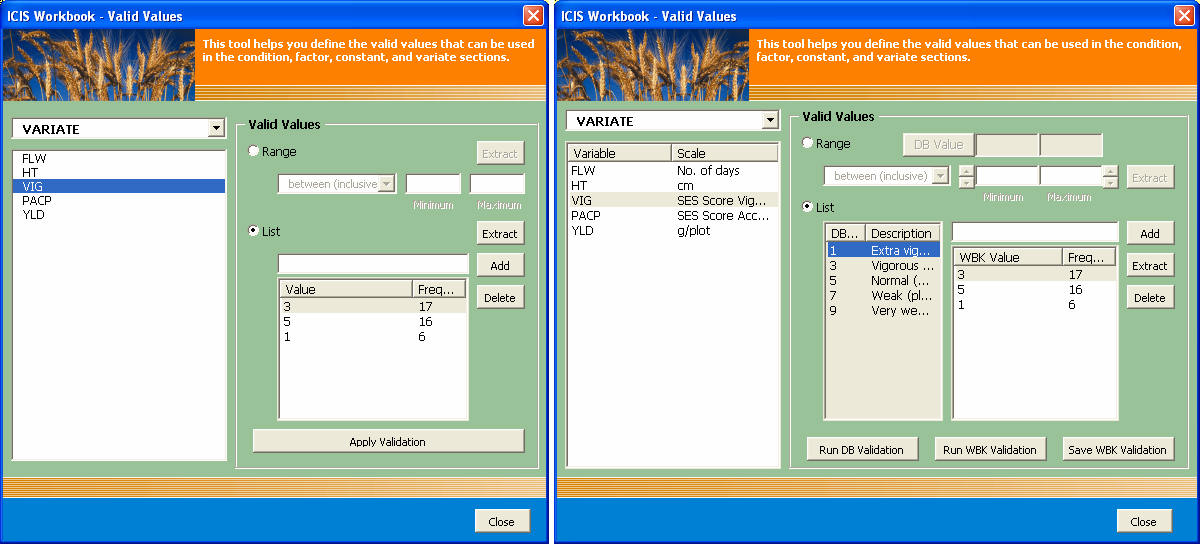
Comparison of the old and new Valid Values user interface
The current development state of this user interface is that the user can now see the valid values stored in the database, together with the description of the values, and compare them with the actual values on the current workbook file via the Extract button. The single Apply Validation button has been splitted into three: Run DB Validation, Run WBK Validation, and Save WBK Validation.
Run DB Validation - will apply the data validation procedure based on the valid values stored in the database. (Not yet functional)
Run WBK Validation - will apply the data validation procedure based on the valid values just specified by the user and store these valid values in the workbook file.
Save WBK Validation - will replace the valid values stored in the database with the newly specified values by the user, but only after proper authentication of authority has been made. (Not yet functional)
The data validation procedure will simply highlight the erroneous cells with a red color to indicate the need for corrective measures. Further improvement of this interface involves a button to generate control charts for visualization to easily spot outliers.
Moreover, a new menu and toolbar icon "Show Valid Values" was added to give the user a hint on the recorded valid values in the database so as to avoid receiving an error message later during data validation which eventually causes a delay in the loading of the study.
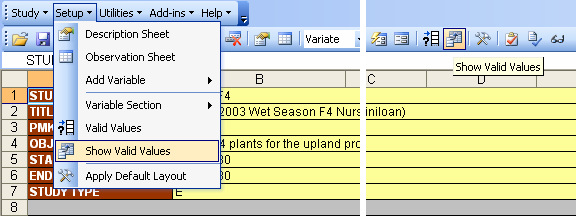
Show Valid Values menu and toolbar icon
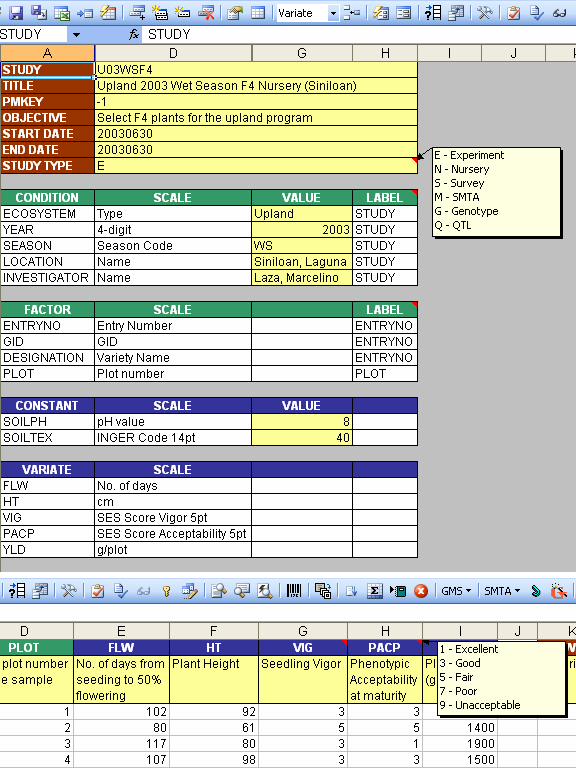
Valid Values displayed as comments in the corresponding variable columns
The valid values are displayed as comments on the corresponding column headers in the Observation sheet, and comments on the Value cells for the condition and constant variables in the Description sheet, as well as on the Study Type cell and the Label column headers. The user may however notice that after executing the function, not all cells were able to get a comment containing the valid values. This simply means that no valid values are recorded in the database for the particular Scale that was used on the respective variables. This serves as a call of attention to administrators that they should supply the valid values in the database, or that there may be something wrong with the Scale used in the Description sheet.
Study Folders and Status
ICISworkbook ver.5.5.1 now allows studies to be organized into folders similar to SetGen lists. Thus, the user interface has been redesigned to accomodate the tree view of the study hierarchies. Furthermore, studies can now be searched via the study title. The new user interface also makes use of a cookie to remember previous searches. Thus, the old search textbox was replaced with a combobox that lists the keywords used in the past in searching for studies.
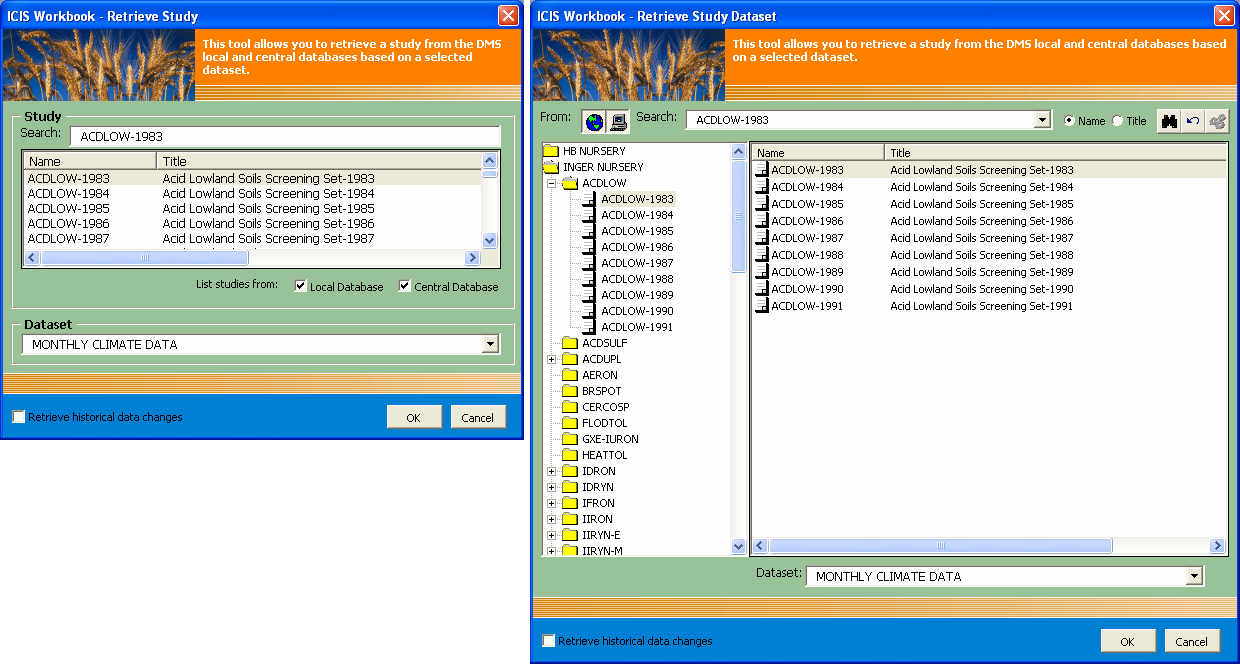
Comparison of the old and new Retrieve Study user interface
Like a list in SetGen, a study can also be Locked, Hidden, or Final. Setting this Study Status can be done via the Study Settings user interface which is accessible in the main Study form through the button with gears as its icon. This interface also provides the button to clear the search history list.

Study Settings user interface
Before, loading a study does not involve a user interface. Now, the same user interface is used as with the Retrieve Study function to allow the user to indicate in which folder the new study would belong, or new folder and subfolders can be instantly created to place the new study. Furthermore, the user can enter a dataset name to be used. This however is only useful for single dataset studies. If the new study contains more than one representation, the old way of denoting which factors and variates belong to which representation takes priority over the dataset name specified on this user interface.
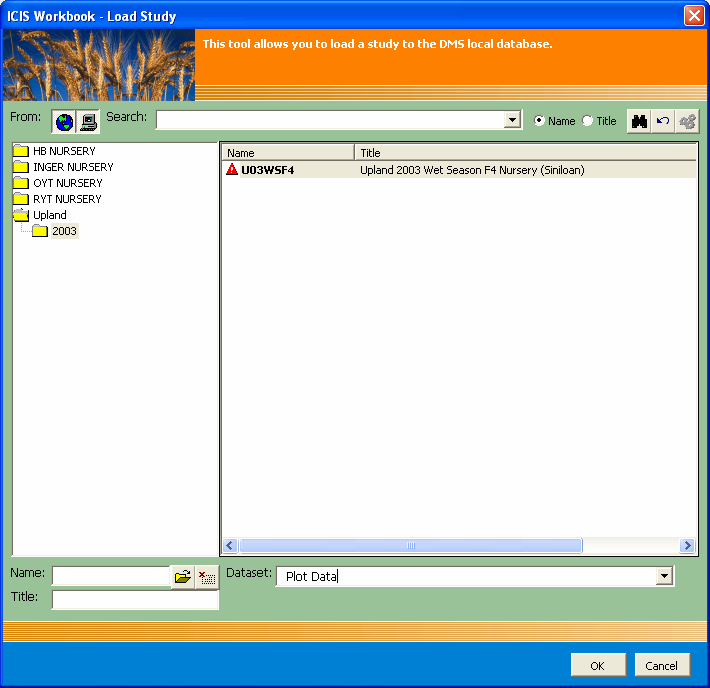
Load Study user interface
The same user interface as with the above two functions is also now being used in deleting a study. And it is now possible to delete a folder and the studies contained in it. In addition, a Study Status = 9 which marks a study to be deleted without physically deleting it from the database is now implemented as well. In order to use this functionality, a new INI key entry "RecycleBin=True" must be set in the INI file.
Multi-user Database Access
ICISworkbook can be tuned up in a multi-user environment to enable database locking. To do this, the INI key entry "DMS_Status=1" must be set. When this key is set, the DMS Status menu and toolbar icon is visible to the user.
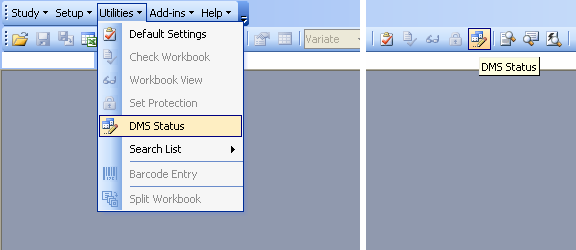
DMS Status menu and toolbar icon
During loading of a study, the DMS_STATUS field in the INSTLN table of the local database is set to contain the user ID of the user who has the right to write on the database at that point of time. This is signaled by the change in icon of the DMS Status menu and toolbar button.

DMS Status menu and toolbar icon when the DMS database is locked by the user
This change may only be for a few seconds since the default icon will return as soon as the database is freed after the loading operation. There are also two new INI keys now supported by the application: "DMS_Wait" to indicate the number of seconds to pause and try accessing the database again if it's already free, and "DMS_Retry" to indicate the number of times to check for the database availability before telling the user to try again later.

