Uploading pedigree
From ICISWiki
Contents
|
UPLOADING CROSS HISTORIES AND PEDIGREE NOTES FROM HISTORICAL RECORDS TO A LOCAL ICIS DATABASE
By Shawn Yates and Dr. Fran Clarke, Agriculture and Agri-Food Canada, SPARC, Swift Current, Saskatchewan, Canada
Introduction
The ICIS Breeder’s interface allows breeders to generate new crossing records and pedigree nurseries from previous lists and historical pedigree information. The use of the SETGEN application to do this ensures unique identification of breeding lines, standard and accurate nomenclature and maintenance of correct pedigree information.
The first problem faced by a breeding program wishing to use ICIS is to capture historical information so that the SETGEN process has the raw material on which to operate. Fortunately this is a one-off task, but nevertheless it is not trivial and requires a good understanding of your historical notation and records as well as knowledge of the ICIS system.
These instructions are a record of how the SPARC wheat breeding pedigree books were transferred into an ICIS GMS local database. Other breeding programs may be able to apply some or all the following techniques for entering their pedigrees. There are three sections to the notes dealing with different aspects of the process.
The first section demonstrates how to bulk-load cross histories from historical sources. This works well when a large batch of cross histories are stored in chronological order in standard Purdy notation. Sometimes only a few crosses are involved, or the cross histories are complicated and non-standard. When this occurs, they should be entered in interactive mode, one at a time and usually cross by cross through the history. In practice a combination of batch and interactive processing is usually required. It is often advantageous to start with interactively entering very old, pedigrees of parents imported into a program and the complicated crosses in the historical records before bulk loading the remainder.
The third section deals with documenting crosses which have been entered into ICIS with cross and selection details taken from historical records. The process involves attaching the GID of the cross to each piece of information to be stored and then loading these records to the ATRIBUTS table of ICIS. The particular historical records are always very specific in format and content for each breeding project, but the approach demonstrated here is quite general.
Entering Cross Histories Into ICIS Using Batch Mode In SETGEN
NOTE: To ensure the accuracy and integrity of information in the ICIS environment, only the person designated as ICIS Administrator should enter pedigree information.
Entering Pedigree Information into ICIS is done through the use of the SetGen program, found on the ICIS Launcher. The actual process is quite simple; however there are some steps that must be completed prior to the actual entering of the information into the ICIS local database. These steps are:
- Edit the pedigree book,
- Import the pedigree book into Excel, and
- Using SetGen, enter the information into the database.
Edit the Pedigree Books
- Open the pedigree book you want to enter into ICIS.
- You will notice that it is formatted so that the cross name and parents are listed, followed by the historical information. The historical information will be added at a later date so it must be deleted from the file.
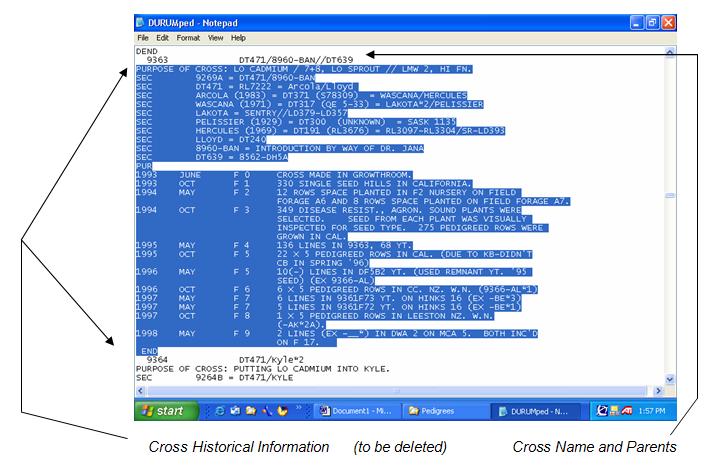
- Copy the Pedigree Book into a temporary file somewhere on your C: M: or P: drives. This will be the one you edit.
- Open a text editor, such as VEDIT or NU-TPU and import the pedigree book.
- Delete all historical information below each row with the cross name. This may take some time so you may want to consult with your text editor’s instruction manual as to how to write a macro to do this for you.
- When you are finished, you should have a text file that has only the pedigree names and corresponding cross on each line.

- If you are entering in a large amount of crosses, you may want to break them up into sections. For example, you may want to cut and paste all the crosses from 1970-1980 into a separate file, all the crosses from 1981-1990 into another file and so on. This will make troubleshooting much easier in the future. If you only have a few entries, then this will not be a concern.
Import The Pedigree File Into Excel
- Now we have to import our edited text file into Microsoft Excel. Open Excel and click on DATA>IMPORT EXTERNAL DATA>IMPORT TEXT FILE
- Locate your edited pedigree file and click on it. Click on FINISH.
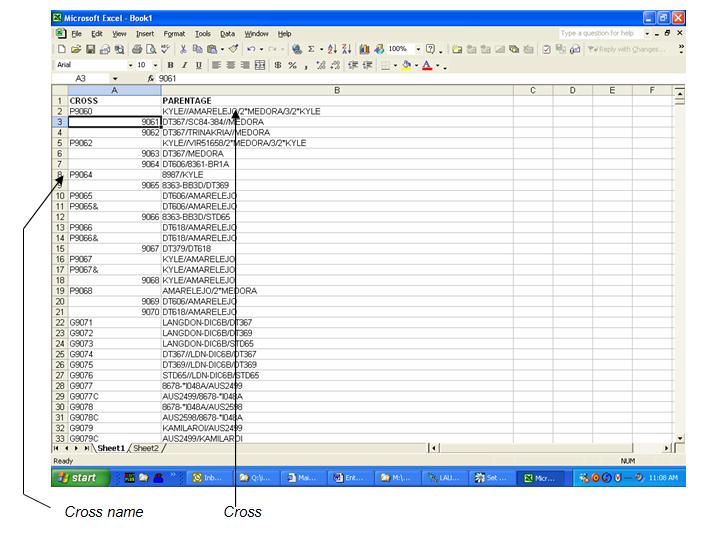
- You should now have your file in ICIS, with the cross name in the first column, and the germplasm crossed in the second. Make sure to clearly identify each column heading in the first row.
- Check to make sure that you did not leave any blank spaces in the columns. This will cause problems with the Import tool in SETGEN. If you find missing information in any of the column, cut and paste them to a new spreadsheet and enter them in manually at a later time.
Entering the Pedigree Information Into GMS
- Now that you have your Excel spreadsheet set up with cross names and the corresponding parentage information, you need to import that list into the GMS and assign GIDs. In your Excel spreadsheet, create an ENTRYCODE column filled with some kind of unique Entry Code (sequential numbers for instance)
- Open SETGEN and click on LIST>IMPORT LIST and the Import Germplasm List screen appears
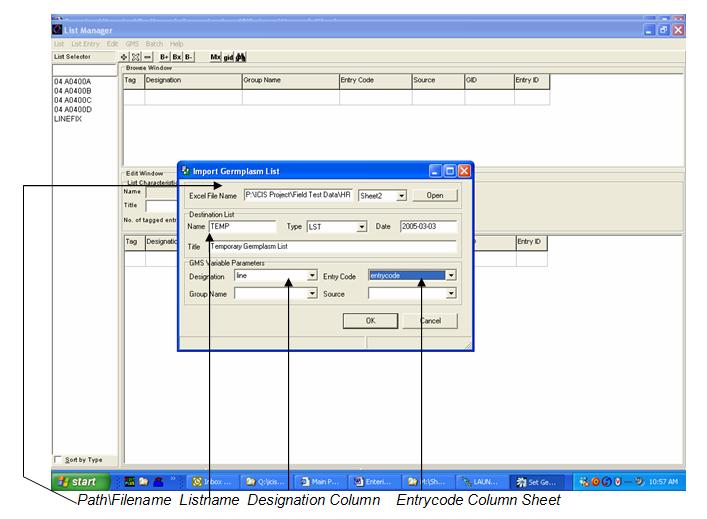
- In the Excel File Name field, enter the path and name of your Excel spreadsheet or click on OPEN and find it. Then select which sheet in the spreadsheet your information is in from the drop-down box next to the Excel File Name field.
- Enter a name for your list in the Destination List section of the screen. You can also specify what type of list you are importing, as well as the date and a title.
- If you are importing a list of germplasm that you want to generate GIDs for, type TEMP in the name field.
- Under GMS Variate Parameters, four fields are available: Designation, EntryCode, Group Name and Source. When you click on the drop-down box for each of these fields, you will find the column headings from your Excel spreadsheet listed here. Choose the appropriate columns for each field and click OK
- The Import Tool will create a new list in SETGEN, called TEMP which will contain all of your entries from the spreadsheet. You will then be asked if you would like to save. Click YES
- The Generate GIDs in Batch Mode screen appears
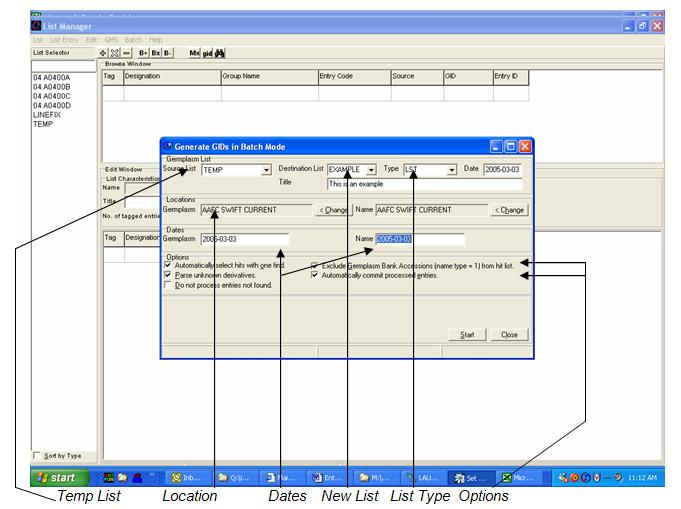
- In the Source List field, the TEMP list should be selected, if not then choose it from the drop down box
- Enter a name of the new list you are creating in the Destination List field. You can also specify a Type and Date, if you wish.
- Choose a location and a date from the Locations and Dates sections. What you enter here will apply to all new germplasm that you are entering into the GMS
- Decide which options you would like for the generating of GIDs, and click START.
- The system will evaluate each entry from the TEMP list, parse those which are new and if an entry in the list is found in the GMS, a prompt will come up asking you to choose it, or create a new one.
- When finished, SETGEN will tell you how many of the entries it was able to parse. If there were errors, go back and check your spreadsheet for any mistakes, delete the TEMP list from SETGEN and start again.
- If all entries were properly parsed, click OK and delete the TEMP list as it is no longer needed.
Entering Cross Histories Into ICIS Using Interactive Mode in SETGEN
- When a small number of pedigrees need to be entered into the ICIS system, the batch method may not be the most time efficient. In these instances, these pedigrees may be entered by creating a SETGEN list or adding to a current SETGEN list. This method also works when pedigrees are very complicated and the batch method becomes confused as to how to process them.
Create a SETGEN list
- Open SETGEN from the ICIS Launcher.
- Notice the different sections of the SETGEN screen (some of these have been mentioned in the BATCH ENTRY tutorial <Entering Pedigrees (Batch Mode).doc> and will not be mentioned here)
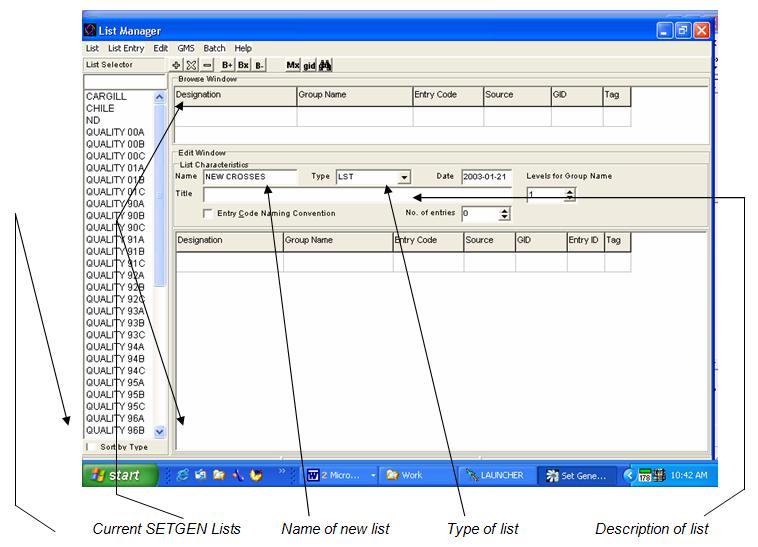
- Creating a list in SETGEN is very simple. In the EDIT WINDOW, notice that there are a few empty fields
- NAME: - enter a name for your list (there is a limit to the number of characters you can use, so abbreviate if necessary)
- TYPE: - the type of list you are creating. For example, if you are entering an F1 list of pedigrees, you could choose the F1 type of list. This is an option to give more explanation to what kind of list you are creating.
- DATE: - Date that you created the list (default is the current date)
- TITLE: - Here is where a more detailed description of what is in the list can be put. It will help others who view the list understand what they are looking at.
- There are other options available, but for now, just fill in the NAME, DATE and TITLE fields.
Enter New Pedigree Information Into The SETGEN List
- Now that the List is created, the pedigrees must be entered in.
- Above the BROWSE WINDOW, is a tool bar with buttons on it.
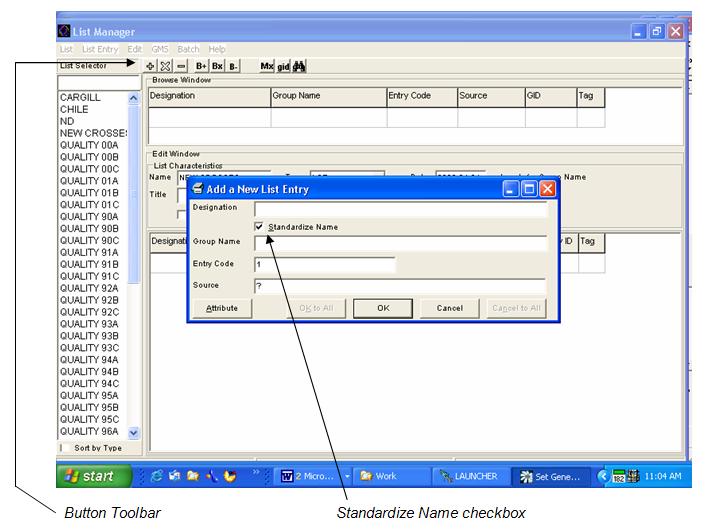
- The buttons on the toolbar have various meanings, some of which will not be discussed here. To enter a new cross into your list, click on the + button.
- The NEW LIST ENTRY window will now pop up. This is the first of 3 screens where you will enter information about the cross.
- In the DESIGNATION field, enter the name or identifier of your cross (G9802, P3721, BW644, etc)
- Under the DESIGNATION field, is the STANDARDIZE NAME checkbox. If you wish to have all entries standardized (i.e. all following the same naming convention) then keep this box checked. Note, however that if the naming convention has not been used in other lists, you may have trouble linking certain parents and crosses together. Also, standardizing the name will put spaces between alpha numeric and numeric characters, so P8907 will become P 8907. If this causes problems, uncheck the box.
- GROUP NAME is where you will put the parents of your cross, in Purdy Notation (Ex, P9903/AC KARMA)
- ENTRY CODE is generated by the system. It is simply an incremental integer count that goes up with each cross you enter in.
- SOURCE can be filled out if you wish to document where the cross came from. This is up to the user and can be anything from which field the cross was planted to the material the parents were from.
- The ATTRIBUTE button on the bottom left of the screen is where you can add specific information or notes about the cross. This can also be done in a batch process (see ENTERING PEDIGREE HISTORIES INTO THE GMS DATABASE.DOC)
- Click on OK when finished.
- The system will now check through the GMS Central and Local Databases to see if there is a match between the cross you just entered and one already entered. If there is, a screen will pop up, asking you if the match is correct.
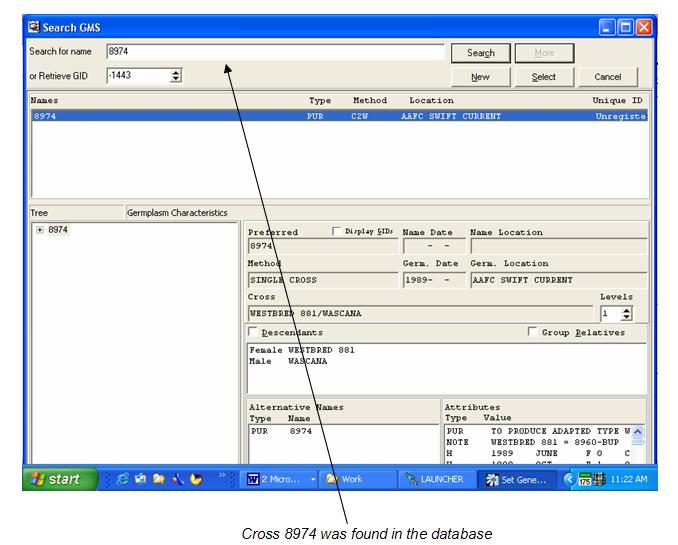
- If the information being presented is the same cross, click SELECT
- If the cross you entered is not the one being presented, then click on NEW
- The next screen that pops up is asking for more information about the Name and Method of the cross.
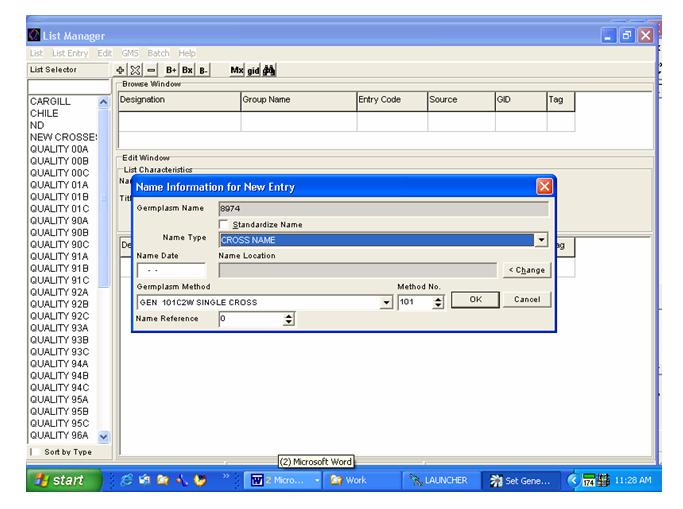
- NAME TYPE: -determined by selecting a type from the pull down menu the most appropriate descriptor of the name of your cross.
- NAME DATE : - the date of when the name was designated to the cross
- NAME LOCATION: - if the field is empty or incorrect, select the CHANGE button and select the correct location of where the cross was created (you can also add a new location if it is missing)
- GERMPLASM METHOD: - The method is how the cross was created or crossed. The Method will decide how the system will parse the cross you entered. It will also affect how the Coefficient of Parentage will be calculated so if there is any doubt as to the method of how the cross was created, you should consult with the breeder.
- Click on OK when done.
- The next screen works deals with information about the cross, different names, locations and date. Some of this may have already been entered in and some information may have to be entered again.
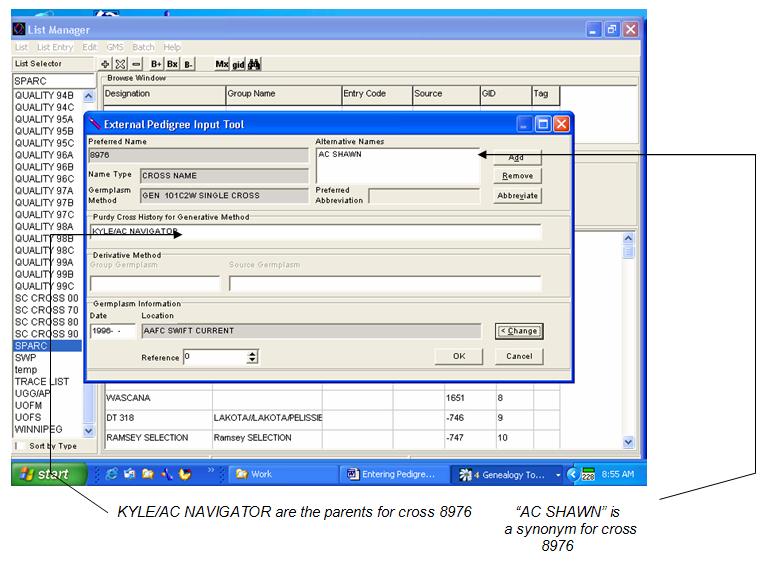
- Note that the information in the grayed out fields comes from previous screens and cannot be changed unless you press CANCEL and go back
- Under ALTERNATIVE NAMES, click add to enter a new synonym for the cross
- The cross goes in the field labeled PURDY CROSS HISTORY FOR GENERATIVE METHOD
- Finally, fill in the date and location of the cross, if known in the bottom two fields
- Click OK
- The cross has now been added to the SETGEN list and a GID number has been created for it. If any errors occur, double check the information you are entering and start over.
Enter a Selection From A Cross Into The SETGEN List
- To enter selections from a cross into SETGEN is very easy.
- Open a SETGEN list or create a new one where you want to add your selection cross
- Selection notation varies from breeder to breeder, so consult with your breeder as to how they record selections.
- At SPARC, a dash is used, followed by alphanumeric and numeric designations to show each generation.
- For Example, a selection from 8976 could be 8976-AB12 (F2 selection).
- Click on the + button at the top of the SETGEN screen to add a new entry
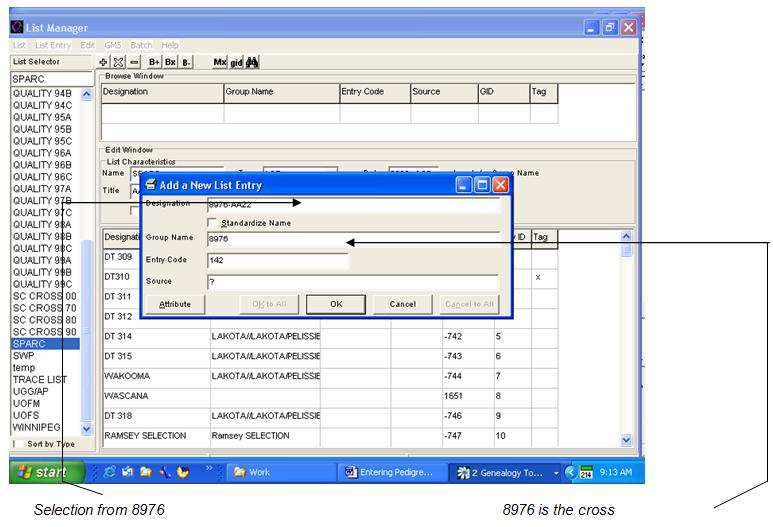
- In this case, the DESIGNATION will be the selection, and the GROUP NAME will be the cross the selection was taken from
- Click OK and the system will start searching for the selection you entered. If it cannot find that, it will move onto the next screen.
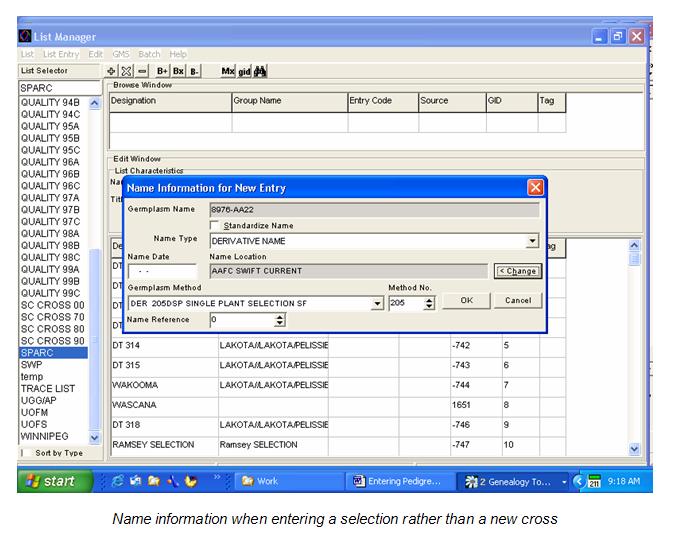
- Note that this time, under NAME TYPE, instead of CROSS NAME being the default, DERIVATIVE NAME has come up.
- Also notice that under GERMPLASM METHOD, SINGLE PLANT SELECTION has been chosen. Make sure that these are correct (i.e. the selection is from a single plant and not from a bulk, etc)
- Click OK
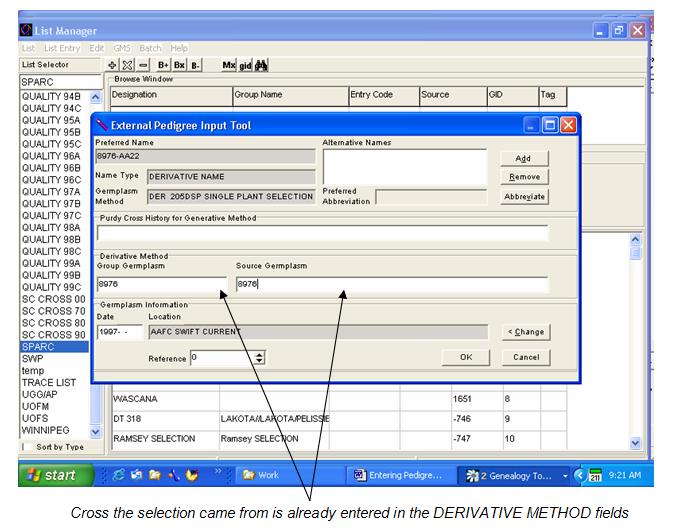
- The next screen allows you to enter all of the same information (names, date, location, etc) but notice that now, instead of listing the cross in the PURDY CROSS HISTORY FOR GENERATIVE METHOD, the cross is already entered in the DERIVATIVE METHOD field boxes.
- GROUP GERMPLASM: - the overall grouping of the selections
- SOURCE GERMPLASM: - if the selection you are entering comes from a specific source or “branch” within the group you can enter this here.
- In most cases, the GROUP GERMPLASM and the SOURCE GERMPLASM are going to be the same.
- Click OK and the system will search for the cross the selection came from. If you get a hit, a screen will pop up (see Section 2) asking for you to decide if what it found is the correct cross. If nothing is found, the system will automatically start the process for you to enter the new pedigree, and then link the selection to that.
Entering Crossing and Selection Notes Into The GMS Database
- Open the Excel Spreadsheet “M:\Genetics\ICIS\Histories\Durum Histories.xls”
- Scroll down to the last line that has numbers in the first 4 cells.
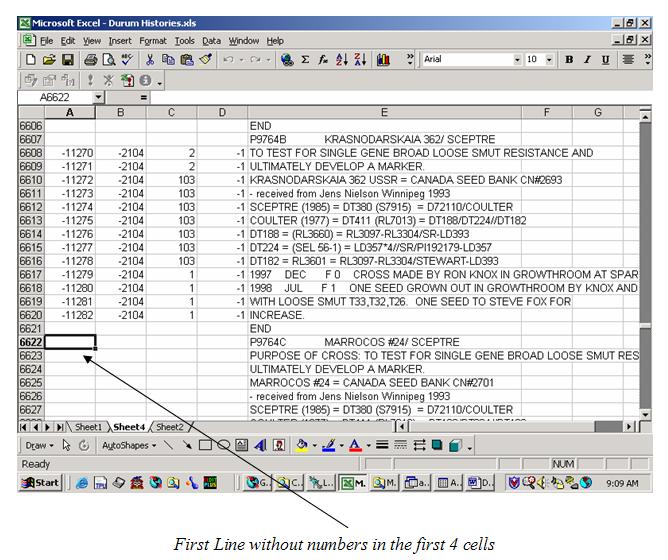
- Open the ICIS Launcher, select SETGEN and click on RUN
- Looking at the spreadsheet, find the year the cross was made by the name of the next cross with no information. In the above example, the next cross is P9764C. The first numbers in the cross state which year the cross was made. So, for this example, the cross was made in 1997.
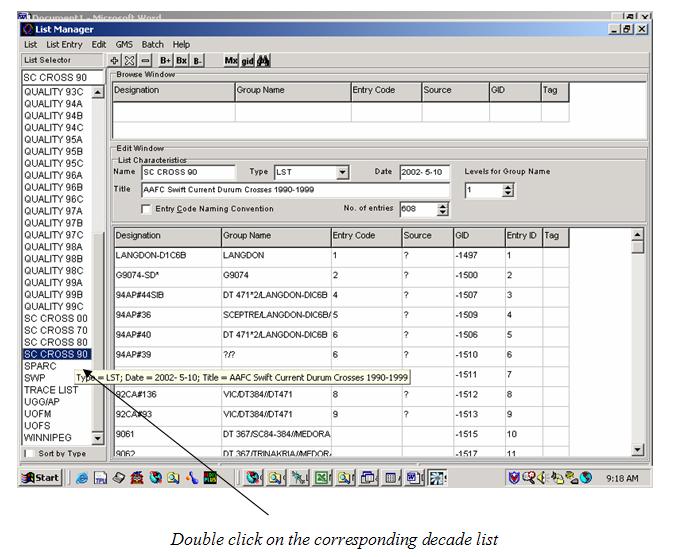
- In SETGEN, you will notice a box labeled “List Selector”. In it are various lists that are entered into ICIS. The crosses made at SPARC are called “SC CROSS xx”, where xx relates to the years. Scroll down and find the appropriate list in the List Selector Box and double click on it. In the above example, click on “SC CROSS 90”
- Scroll down through the crosses listed in the “DESIGNATION” column in the “EDIT” window until you find the cross that is listed on the spreadsheet.
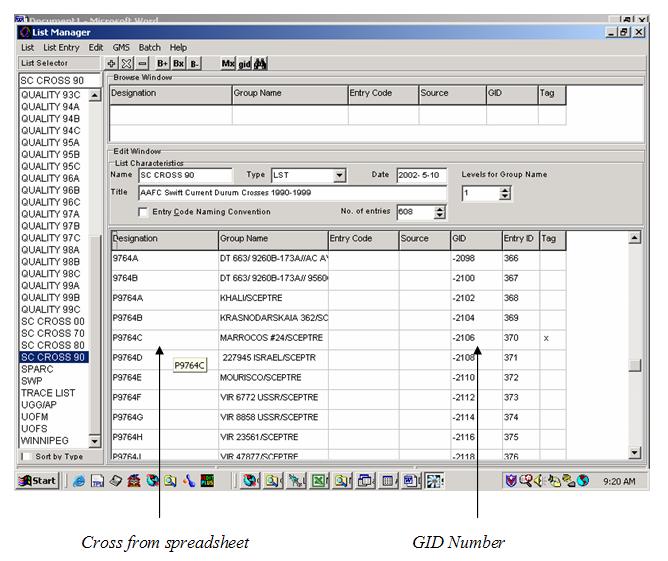
- From this list you need to pay close attention to two columns. The “DESIGNATION” column, which contains the cross name and the “GID” column. The Excel spreadsheet was created using the SPARC Pedigree book for the particular variety (Durum, HRS, CWES), and for the most part, the order of the crosses will correspond to the SETGEN list. However, sometimes crosses need to be entered in separately, especially when they are complex crosses. In this case, the some crosses on the SETGEN list may be out of order and at the bottom of the list, so you have to carefully check that the cross you are looking at is the same one on the spreadsheet.
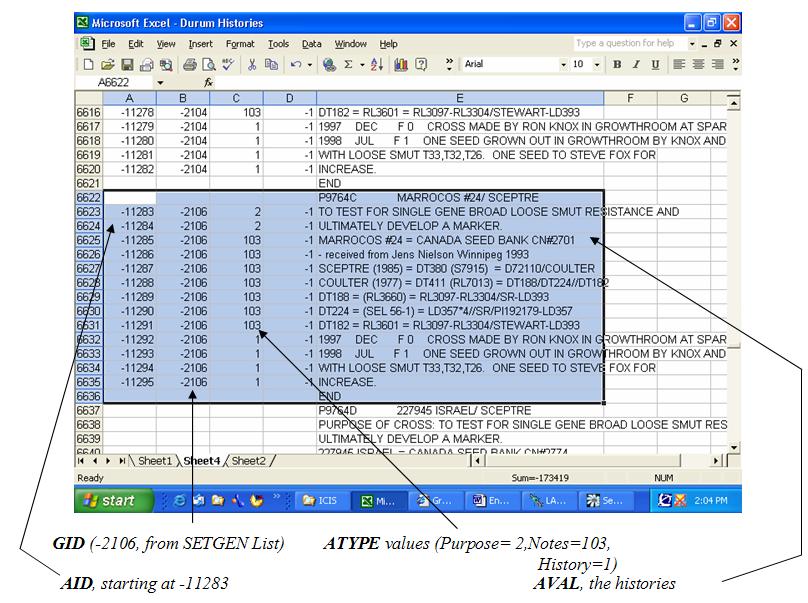
- GIDs are numbers generated by ICIS to uniquely identify every cross and parent entered into the database. Negative GIDs refer to crosses entered into the local database. Conversely, positive GIDs refer to the crosses entered into the central database. Refer to ICIS Manual or Shawn for explanation of Local and Central Databases. This means that the GID column is ICIS’s way of identifying the cross, so it needs to be added to the Excel spreadsheet.
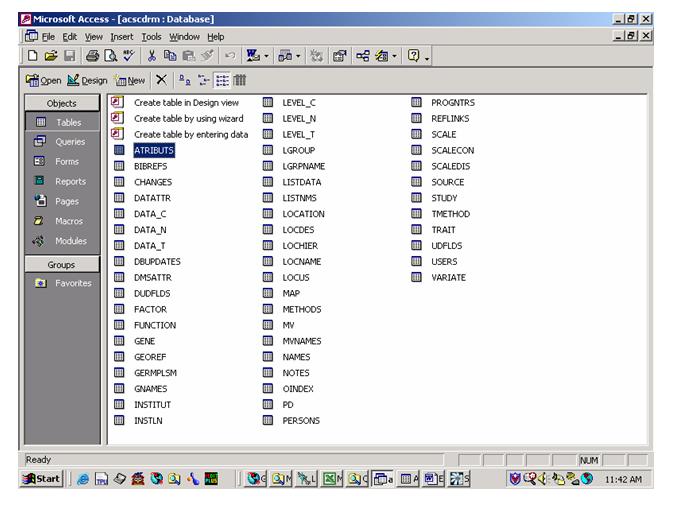
- First, we need to look at the table in the database where this information is stored. Double click on the database called M:\Genetics\ICIS\acscxxx.mdb, where xxx can be drm (Durum), cwes, or hrs (Hard Red Springs).
- Double click on the table called “ATRIBUTS”. For the above example, open the Durum database (acscdrm.mdb).
- The Excel spreadsheet is set up to mirror this table. The first 4 blank cells in the spreadsheet correspond to the 4 columns in the table.
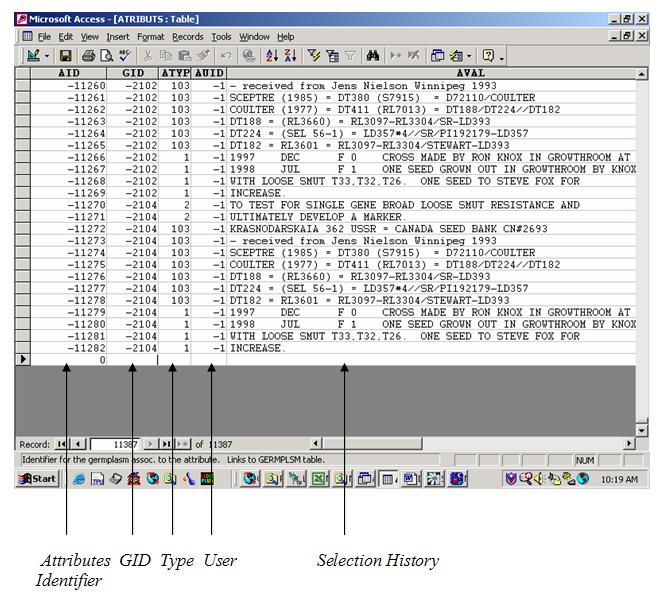
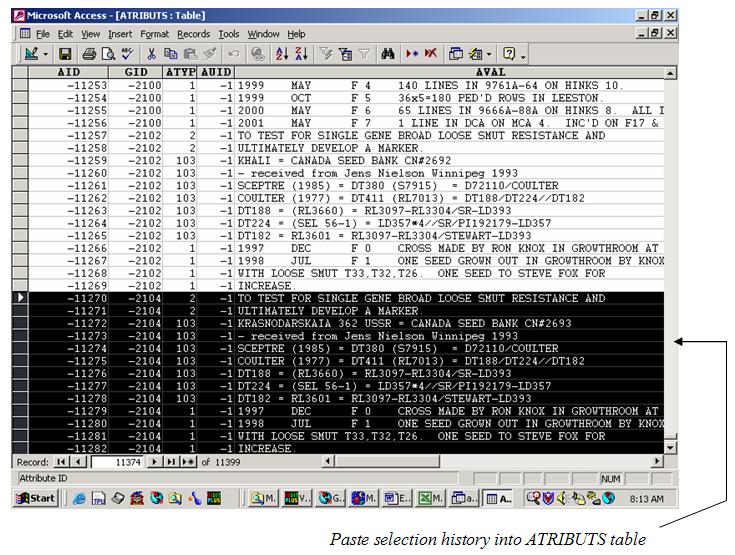
- AID: - Attribute Identifier. This column is used by ICIS to identify each entry in the table, and to determine the order in which the information should be displayed. It is a sequential count (-1..-2..-3..etc). The negative sign refers to the local database.
- GID: - cross identifier for ICIS. Notice that the pedigree name does not appear anywhere in this table. That’s what the GID does, and why you need to enter it into the spreadsheet.
- ATYPE: - Attribute Type. This column tells ICIS what each entry is. For example, the value 2 stands for Purpose Of Cross. If you look in the Pedigree book, or even on the Excel Spreadsheet, most crosses have a Purpose of Cross right under the cross name. This information will be entered is as such by putting a value of 2 in the ATYPE field. There are hundreds of predefined attribute types that ICIS provides, but for the purpose of entering in Cross Histories, you only need to use 3 of them (There is more about the Attribute Types below):
- 2 = Purpose of Cross
- 103 = Notes (for example, parentage or notes about the cross)
- 1 = Selection histories (the information about each filial generation, where it was seeded, when it was harvested, etc)
- AUID: - this tells ICIS who is entering the information.
- AVAL: - the information from the spreadsheet and pedigree book.
- Open the Pedigree Book and become familiar with it (you can find the Durum Pedigree Book in M:\Marlin Olfert\Pedigrees\DURUMPed.txt, the CWES can be found in M:\Marlin Olfert\Pedigrees\CWES-ped.txt, Hard Red Springs can be found in M:\Grant McClare\pedigree\EGHRS-PED.txt). Understanding the format that is used will be immensely important to knowing what type of attribute you are entering.
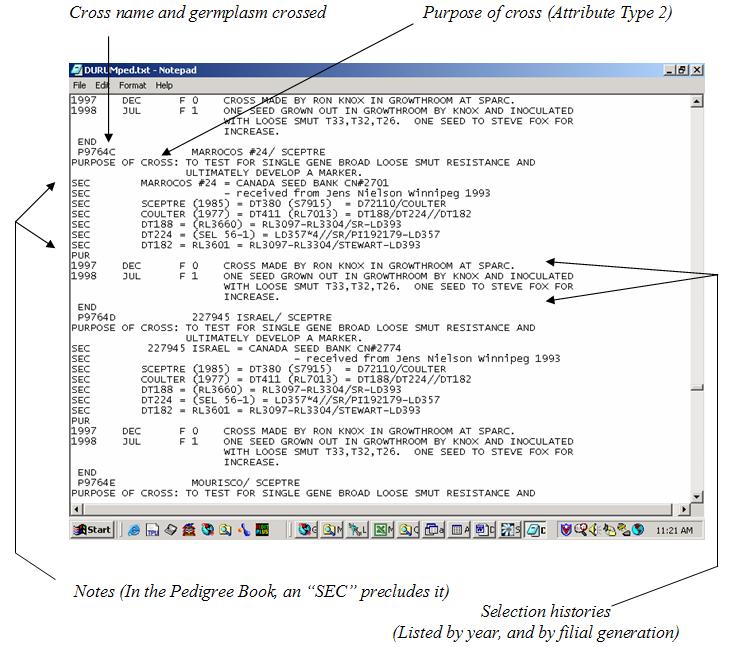
- The Histories Excel spreadsheet has eliminated the “SEC” at the beginning of the notes for output purposes (others using ICIS may not understand what “SEC” means). For the first while, you may want to check with the Pedigree Book as to what type of attribute you are entering, until you become more comfortable with the Attribute Types.
- Now that you have all the information in front of you, you need to enter it into the Excel spreadsheet. Go back to the Histories Spreadsheet and take a close look at it again.
- Skip the first line which has the Cross Name and Germplasm Crossed, as that information has already been entered into ICIS previously.
- The second line will usually (but not always) have the Purpose of the Cross in it. If this is the case, you need to delete the words “Purpose of the Cross:” because that information will already be included when you enter the Attribute Type. It saves repetition. For some crosses, there is no Purpose of Cross entered, so you just leave it out and what will be on that line will be the start of the notes section.
- Next scroll down until you find the cell with “PUR”. Delete that entire line (refer to Excel help if you don’t know how). That is a reference from the Pedigree Book, and usually will help you to know where the Notes section ends and the History section starts, but may cause confusion to those not familiar with the SPARC Pedigree Books.
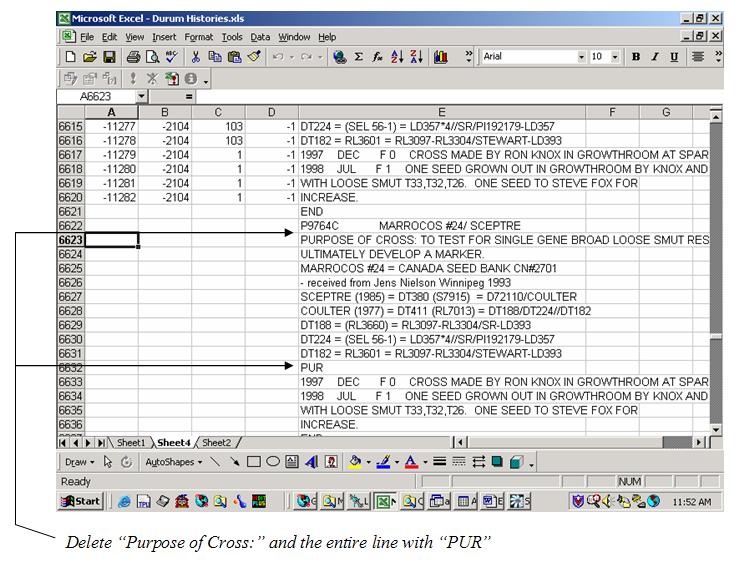
- The spreadsheet should now look similar to this:
- In the column to the left of the information, (column D in the example above) the USER column put a -1. You can copy and paste this value to the other cells in the column. Stop at the one just before the word “END” or “DEND” appears in the information column.
- In the GID column (column B above), put the cross’s corresponding GID number, which you previously found from the SETGEN list.
- Fill in the ATYPE column (column C) above, referring to the Pedigree Book if you are unsure which of the three types of attributes the information falls into. Remember, 2= Purpose of cross, 103=Notes, 1= History.
- Finally, fill in the AID column (column A), which is simply a count. Open the ATRIBUTS table in the database again. Check to see what the last value in the AID column is (in the example above, it is -11282, meaning that 11282 entries have been put into the table), and start counting from there. Remember that because you are using a local database, you have to make sure you put a negative sign in front. Therefore, in the above example, the first entry in the AID column should be -11283 and so on.
- Note: to speed the process up and avoid errors, you can have Excel fill this column in for you. Enter the first value in the first cell (-11283 in the example). Starting with that cell, select all the cells that you will have to fill in. Click on EDIT>>FILL>>SERIES. Make sure you change the “STEP VALUE” from 1 to -1 (so it counts in the negatives) and press ok. The numbers should now be filled in. Refer to the Excel Help if you have problems with this feature.
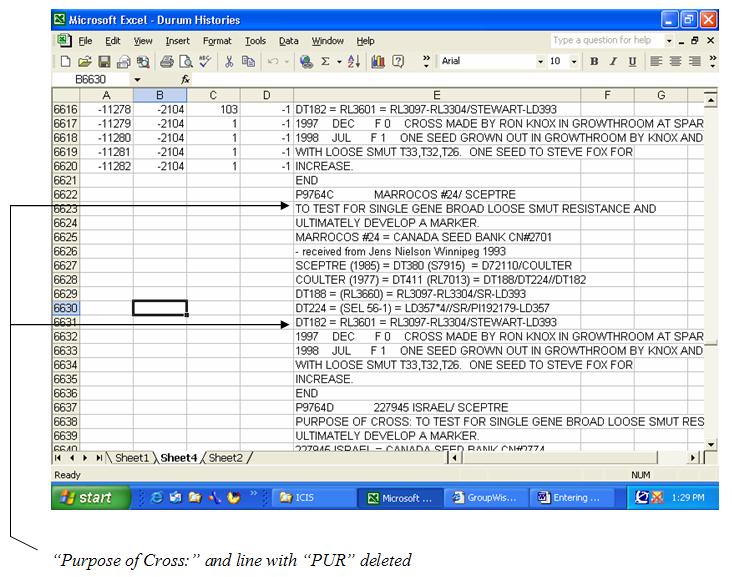
- Your spreadsheet should now look like below (the entire cross information has been highlighted so it’s easier to follow):
- Now you have to copy and paste this information from the spreadsheet to the database table. Select only the cells that contain the relevant information (do not select the line with the Cross Name and Germplasm Cross, nor the line with “END” or “DEND” in it) and copy.

- Open the ATRIBUTS table and scroll down to the very end. Click on the record number on the very leftmost column of the table and the whole line should be selected. In Access, you need to select the whole line to paste. If you only select the first field (cell) you will get an error because the program will try to paste all the information into only that cell. Paste the information in and click on save. The selection history information is now entered into the ICIS database.
- To double check that the information was entered correctly, close SETGEN, selecting No if it asks you if you want to save. Select GMSSRCH from the Launcher and RUN. Type in the cross you just finished updating and click on “GO”. The information should appear in the bottom right box, called “ATTRIBUTES”.
- If this information does not appear, open the ATRIBUTS table and SETGEN again and double check that you have the correct GID number. If not, change it to the correct one and try again.
- Careful double checking of the spreadsheet prior to the copy and paste into the database table can save enormous amounts of time should an error occur. Once again, familiarity with the SPARC Pedigree Books can also be a great time saver.

